SFP modules on a board running Linux

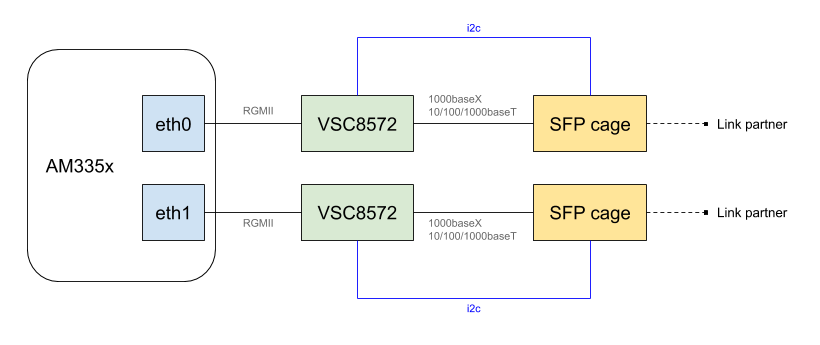
We recently worked on Linux support for a custom hardware platform based on the Texas Instruments AM335x system-on-chip, with a somewhat special networking setup: each of the two ports of the AM335x Ethernet MAC was connected to a Microchip VSC8572 Ethernet PHY, which itself allowed to access an SFP cage. In addition, the I2C buses connected to the SFP cages, which are used at runtime to communicate with the inserted SFP modules, instead of being connected to an I2C controller of the system-on-chip as they usually are, where connected to the I2C controller embedded in the VSC8572 PHYs.

The below diagram depicts the overall hardware layout:

Our goal was to use Linux and to offer runtime dynamic reconfiguration of the networking links based the SFP module plugged in. To achieve this we used, and extended, a combination of Linux kernel internal frameworks such as Phylink or the SFP bus support; and of networking device drivers. In this blog post, we’ll share some background information about these technologies, the challenges we faced and our current status.

Introduction to the SFP interface

SFP moduleThe small form-factor pluggable (SFP) is a hot-pluggable network interface module. Its electrical interface and its form-factor are well specified, which allows industry players to build platforms that can host SFP modules, and be sure that they will be able to use any available SFP module on the market. It is commonly used in the networking industry as it allows connecting various types of transceivers to a fixed interface.

A SFP cage provides in addition to data signals a number of control signals:

  • a Tx_Fault pin, for transmitter fault indication
  • a Tx_Disable pin, for disabling optical output
  • a MOD_Abs pin, to detect the absence of a module
  • an Rx_LOS pin, to denote a receiver loss of signal
  • a 2-wire data and clock lines, used to communicate with the modules

Modules plugged into SFP cages can be direct attached cables, in which case they do not have any built-in transceiver, or they can include a transceiver (i.e an embedded PHY), which transforms the signal into another format. This means that in our setup, there can be two PHYs between the Ethernet MAC and the physical medium: the Microchip VSC8572 PHY and the PHY embedded into the SFP module that is plugged in.

All SFP modules embed an EEPROM, accessible at a standardized I2C address and with a standardized format, which allows the host system to discover which SFP modules are connected what are their capabilities. In addition, if the SFP modules contains an embedded PHY, it is also accessible through the same I2C bus.

Challenges

We had to overcome a few challenges to get this setup working, using a mainline Linux kernel.

As we discussed earlier, having SFP modules meant the whole MAC-PHY-SFP link has to be reconfigured at runtime, as the PHY in the SFP module is hot-pluggable. To solve this issue a framework called Phylink, was introduced in mid-2017 to represent networking links and allowing their component to share states and to be reconfigured at runtime. For us, this meant we had to first convert the CPSW MAC driver to use this phylink framework. For a detailed explanation of what composes Ethernet links and why Phylink is needed, we gave a talk at the Embedded Linux Conference Europe in 2018. While we were working on this and after we first moved the CPSW MAC driver to use Phylink, this driver was rewritten and a new CPSW MAC driver was sent upstream (CONFIG_TI_CPSW vs CONFIG_TI_CPSW_SWITCHDEV). We are still using the old driver for now, and this is why we did not send our patches upstream as we think it does not make sense to convert a driver which is now deprecated.

A second challenge was to integrate the 2-wire capability of the VSC8572 PHY into the networking PHY and SFP common code, as our SFP modules I2C bus is connected to the PHY and not an I2C controller from the system-on-chip. We decided to expose this PHY 2-wire capability as an SMBus controller, as the functionality offered by the PHY does not make it a fully I2C compliant controller.

Outcome

The challenges described above made the project quite complex overall, but we were able to get SFP modules working, and to dynamically switch modes depending on the capabilities of the one currently plugged-in. We tested with both direct attached cables and a wide variety of SFP modules of different speeds and functionality. At the moment only a few patches were sent upstream, but we’ll contribute more over time.

For an overview of some of the patches we made and used, we pushed a branch on Github (be aware those patches aren’t upstream yet and they will need some further work to be acceptable upstream). Here is the details of the patches:

In terms of Device Tree representation, we first have a description of the two SFP cages. They describe the different GPIOs used for the control signals, as well as the I2C bus that goes to each SFP cage. Note that the gpio_sfp is a GPIO expander, itself on I2C, rather than directly GPIOs of the system-on-chip.

/ {
       sfp_eth0: sfp-eth0 {
               compatible = "sff,sfp";
               i2c-bus = <&phy0>;
               los-gpios = <&gpio_sfp 3 GPIO_ACTIVE_HIGH>;
               mod-def0-gpios = <&gpio_sfp 4 GPIO_ACTIVE_LOW>;
               tx-disable-gpios = <&gpio_sfp 5 GPIO_ACTIVE_HIGH>;
               tx-fault-gpios = <&gpio_sfp 6 GPIO_ACTIVE_HIGH>;
       };

       sfp_eth1: sfp-eth1 {
               compatible = "sff,sfp";
               i2c-bus = <&phy1>;
               los-gpios = <&gpio_sfp 10 GPIO_ACTIVE_HIGH>;
               mod-def0-gpios = <&gpio_sfp 11 GPIO_ACTIVE_LOW>;
               tx-disable-gpios = <&gpio_sfp 13 GPIO_ACTIVE_HIGH>;
               tx-fault-gpios  = <&gpio_sfp 12 GPIO_ACTIVE_HIGH>;
       };
};

Then the MAC is described as follows:

&mac {
      pinctrl-names = "default";
       pinctrl-0 = <&cpsw_default>;
       status = "okay";
       dual_emac;
};

&cpsw_emac0 {
       status = "okay";
       phy = <&phy0>;
       phy-mode = "rgmii-id";
       dual_emac_res_vlan = <1>;
};

&cpsw_emac1 {
       status = "okay";
       phy = <&phy1>;
       phy-mode = "rgmii-id";
       dual_emac_res_vlan = <2>;
};

So we have both ports of the MAC enabled with a RGMII interface to the PHY. And finally the MDIO bus of the system-on-chip is described as follows. We have two sub-nodes, one for each VSC8572 PHY, respectively at address 0x0 and 0x1 on the CPSW MDIO bus. Each PHY is connected to its respective SFP cage node (sfp_eth0 and sfp_eth1) and provides access to the SFP EEPROM as regular EEPROMs.

&davinci_mdio {
       pinctrl-names = "default";
       pinctrl-0 = <&davinci_mdio_default>;
       status = "okay";

       phy0: ethernet-phy@0 {
               #address-cells = <1>;
               #size-cells = <0>;

               reg = <0>;
               fiber-mode;
               vsc8584,los-active-low;
               sfp = <&sfp_eth0>;

               sfp0_eeprom: eeprom@50 {
                       compatible = "atmel,24c02";
                       reg = <0x50>;
                       read-only;
               };

               sfp0_eeprom_ext: eeprom@51 {
                       compatible = "atmel,24c02";
                       reg = <0x51>;
                       read-only;
               };
       };

       phy1: ethernet-phy@1 {
               #address-cells = <1>;
               #size-cells = <0>;

               reg = <1>;
               fiber-mode;
               vsc8584,los-active-low;
               sfp = <&sfp_eth1>;

               sfp1_eeprom: eeprom@50 {
                       compatible = "atmel,24c02";
                       reg = <0x50>;
                       read-only;
               };

               sfp1_eeprom_ext: eeprom@51 {
                       compatible = "atmel,24c02";
                       reg = <0x51>;
                       read-only;
               };
       };
};

Conclusion

While we are still working on pushing all of this work upstream, we’re happy to have been able to work on these topics. Do not hesitate to reach out of to us if you have projects that involve Linux and SFP modules!

Feedback from the Netdev 0x13 conference

The Netdev 0x13 conference took place last week in Prague, Czech Republic. As we work on a variety of networking topics as part of our Linux kernel contributions, Bootlin engineers Maxime Chevallier and Antoine Ténart went to meet with the Linux networking community and to see a lot of interesting sessions. It’s the third time we enjoy attending the Netdev conference (after Netdev 2.1 and Netdev 2.2) and as always, it was a blast!

The 3-day conference started with a first day of workshops and tutorials. We enjoyed learning how to be the cool kids thanks to the XDP hands-on tutorial where Jesper Brouer and Toke Høiland-Jørgensen cooked us a number of lessons to progressively get to learn how to write and load XDP programs. This was the first trial-run of the tutorial which is meant to be extended and used as a material to go through the XDP basics. The instructions are all available on Github.

We then had the chance to attend the TC workshop where face to face discussions and presentations of the traffic control hot topics being worked on happened. The session caught our attention as the topic is related to current subjects being worked on at Bootlin.

Being used to work on embedded systems, seeing the problems the Network developers face can sometimes come as a surprise. During the TC workshop, Vlad Buslov presented his recent work on removing TC flower’s the dependency to the global rtnl lock, which is an issue when you have a million classification rules to update quickly.

We also went to the hardware offload workshop. The future of the network offload APIs and support in the Linux kernel was discussed, with various topics ranging from ASIC support to switchev advanced use-cases or offloading XDP. This was very interesting to us as we do work on various networking engines providing many offloading facilities to the kernel.

The next two days were a collection of talks presenting the recent advances in the networking subsystem of the Linux kernel, as well as current issues and real-world examples of recent functionalities being leveraged.

As always XDP was brought-up with a presentation of XDP offloading using virtio-net, recent advances in combining XDP and hardware offloading techniques and a feedback from Cloudflare using XDP in their DDOS mitigation in-house solution.

But we also got to see other topics, such as SO_TIMESTAMPING being used for performance analytics. In this talk Soheil Hassas Yeganeh presented how the kernel timestamping facilities can be used to track individual packets withing the networking stack for performance analysis and debugging. This was nice to see as we worked on enabling hardware timestamping in networking engines and PHYs for our clients.

Another hot topic this year was the QUIC protocol, which was presented in details in the very good QUIC tutorial by Jana Iyengar. Since this protocol is fairly new, it was brought-up in several sessions from a lot of interesting angles.

Although QUIC was not the main subject of Alissa Cooper’s keynote on Open Source, the IETF, and You, she explained how QUIC was an example of a protocol that is designed alongside its implementations, having a tight feedback loop between the protocol specifications and its usage in real-life. Alissa shared Jana’s point on how middle-boxes are a problem when designing and deploying new protocols, and explained that an approach to overcome this “ossification” is to encrypt the protocol header themselves and document the invariant parts of the non-encrypted parts.

A consequence of having a flexible protocol is that it is not meant to be implemented in the kernel. However, Maciej Machnikowski and Joshua Hay explained that it is still possible to offload some of the processing to hardware, which sparked interesting discussions with the audience on how to do so.

Conclusion

The Netdev 0x13 conference was well organized and very pleasant to attend. The content was deeply technical and allowed us to stay up-to-date with the latest developments. We also had interesting discussions and came back with lots of ideas to explore.

Thanks for organizing Netdev, we had an amazing time!

Network traffic encryption in Linux using MACsec and hardware offloading

MACsec is an IEEE standard (IEEE 802.1AE) for MAC security, introduced in 2006. It defines a way to establish a protocol independent connection between two hosts with data confidentiality, authenticity and/or integrity, using GCM-AES-128. MACsec operates on the Ethernet layer and as such is a layer 2 protocol, which means it’s designed to secure traffic within a layer 2 network, including DHCP or ARP requests. It does not compete with other security solutions such as IPsec (layer 3) or TLS (layer 4), as all those solutions are used for their own specific use cases.

We have recently worked on enabling hardware offloading of MACsec operations on a Microsemi VSC8584 Ethernet PHY in Linux, by contributing support for MACsec offloading to the Linux networking stack. In this blog post, we present this work through an introduction to MACsec, details on the current state of MACsec support in Linux and finally our work to support MACsec hardware offloading.

Introduction to MACsec

MACsec uses its own frame format with its own EtherType (a 2-bytes field found in Ethernet frames to indicate what the protocol encapsulated in the payload is). As an example, when encapsulating an IPv4 frame, we would have Ethernet<MACsec<IPv4 instead of Ethernet<IPv4.

The MACsec configuration within a node is represented at the top level by Secure Channels. A secure channel is identified by its SCI (Secure Channel Identifier) and contains parameters such as the encryption, protection and replay protection booleans. A secure channel is either a transmit or a receive one: the receive secure channel configuration on a given host should match the transmit one of another host for MACsec traffic to flow successfully.

Within each secure channel, security associations are described. They are identified by an association number and define the encryption/decryption keys used and the current packet number, which is used for replay protection.

MACsec support in Linux

Linux has a software implementation of MACsec, found at drivers/net/macsec.c, which was introduced by Red Hat engineer Sabrina Dubroca in 2016 and available since Linux 4.5. The support is implemented as full virtual network devices, on per transmit secure channel, attached to a parent network device. The parent interface only sees raw packets, which are in the MACsec case raw Ethernet packets with protected or encrypted content. This design is very similar to other supported protocols in Linux such as VLANs.

MACsec support was also introduced in iproute2, a collection of utilities aiming at configuring various networking parts of the kernel (interfaces management, IP configuration, routes…). The command to use is ip macsec.

If we were to configure a secure channel between two hosts we would first need to create a virtual MACsec interface (representing a transmit secure channel) on both hosts, on top of a physical network interface. Let’s say we use eth0 on both our hosts (Alice and Bob), and we want to encrypt the MACsec traffic:

Alice # ip macsec add link eth0 macsec0 type macsec encrypt on
  Bob # ip macsec add link eth0 macsec0 type macsec encrypt on

The next step would be to configure matching receiving secure channel on both hosts:

Alice # ip macsec add macsec0 rx port 1 address <Bob's eth0 MAC>
  Bob # ip macsec add macsec0 rx port 1 address <Alice's eth0 MAC>

We would then configure the transmit channels, and for each we would need to generate a key:

Alice # hexdump -n 16 -e '4/4 "%08x" 1 "\n"' /dev/random
d29a43c8cba96a325f6b6a40a214c58c
Alice # ip macsec add macsec0 tx sa 0 pn 1 \
        on key d29a43c8cba96a325f6b6a40a214c58c

Bob # hexdump -n 16 -e '4/4 "%08x" 1 "\n"' /dev/random
a1e15a1d91222196fde87b2d75a4fac0
Bob # ip macsec add macsec0 tx sa 0 pn 1 \
      on key a1e15a1d91222196fde87b2d75a4fac0

We finally need to configure the receive channels, so that the hosts can authenticate and decrypt packets:

Alice # ip macsec add macsec0 rx port 1 \
        address <Bob's MAC> sa 0 pn 1   \
        on key 00 a1e15a1d91222196fde87b2d75a4fac0
 
  Bob # ip macsec add macsec0 rx port 1 \
        address <Alice's MAC> sa 0 pn 1 \
        on key 00 d29a43c8cba96a325f6b6a40a214c58c

Once all of the MACsec configuration is done we would be able to exchange traffic between Alice and Bob, using authenticated and encrypted packets:

Alice # ip link set macsec0 up
Alice # ip addr add 192.168.42.1/24 dev macsec0

  Bob # ip link set macsec0 up
  Bob # ip addr add 192.168.42.2/24 dev macsec0

What’s coming next: hardware offloading

There are hardware devices featuring a MACsec transformation implementation which can be used to offload the frame generation and encryption / authentication of MACsec frames (for both ingress and egress frames). The benefit of hardware offloading is to discharge the CPU from doing certain operations (in our case MACsec transformations) by doing them in a dedicated hardware engine, which may or may not provide better performance. The idea is essentially to free the CPU from being used by a single application so that the system in its whole runs better.

MACsec offloading devices aren’t currently supported in the Linux kernel and no generic infrastructure is available to delegate MACsec operation to a given hardware device. At Bootlin over the last months we worked on adding such an infrastructure and support for offloading MACsec operations to a first device.

This work was done in two steps. First we needed to extend the current MACsec implementation to propagate commands and configuration to hardware drivers. Our idea was to leverage the current MACsec software implementation to use the exact same commands described above to setup an hardware accelerated MACsec connection, when a Linux networking port supports it. This should allow to have a more maintainable implementation as well.

We then worked on implementing a MACsec specific helper in a networking PHY driver : the Microsemi VSC8584 Ethernet PHY. This PHY has a MACsec engine which can be used to match flows and to perform MACsec transformations and operations. When configured packets can be encrypted and decrypted, protected and validated, without the CPU intervention.

Conclusion

We recently sent a first version of patch series to the Linux network mailing list, which is currently being discussed. This series of patches introduces both the hardware offloading support for MACsec and the ability to offload MACsec operations to a first hardware engine. We hope support for other MACsec engines will come after!

Feedback from Bootlin at the Linux Plumbers Conference 2018

The Linux Plumbers Conference (LPC) was held a few weeks ago in Vancouver, BC. As always there were several tracks where contributors gave a presentation of on-going or future work, and discussed it with the audience, on specific topics such as thermal, containers, real time, device tree and many more. For the first time at LPC a 2-day networking track took place. As we work on a diversity of networking projects at Bootlin we decided to attend.

Networking track at LPC. Photo @linuxplumbers.

The hot topic of the last couple of years in conferences in the network subsystem is XDP, so the conference was not exception. We saw a handful of talks and discussions about the on-going work and support of XDP within the kernel. XDP provides a programmable network data path (using eBPF) in the Linux kernel to process bare metal packets at the lowest point in the network stack. Packets are processed directly in the drivers’ Rx queues, before any allocation happen (such as socket buffers). Facebook is one well known heavy user of this technology (every packet toward Facebook is processed by XDP) and its engineers gave feedback about how they use XDP and the issues they faced. Other projects and companies are currently evaluating and starting to use XDP as well: we also saw presentations about XDP/eBPF in Open vSwitch, DPDK or kTLS.

While XDP/eBPF was featured in most of the discussions, other interesting topics where brought up. Andrew Lunn gave a presentation about the current need to go beyond 1G copper PHYs for many Linux enabled embedded devices. This was very interesting for us as we used and worked on the technologies used within the Linux kernel to address this, such as Phylink and the SFP bus (we used those when enabling 10G interfaces in the Marvell MacchiatoBin board).

Another presentation caught our attention as the topic was related to what we do at Bootlin. Jesse Brandeburg from Intel talked about the networking hardware offloads and their APIs. He exposed a brief history of the offloads supported by NICs and then showed some issues with the current APIs, where some use cases or behaviors are not clearly defined and sometimes overlap. This is a feeling we share as we experienced it while implementing some of those hardware networking offloads. Jesse’s idea was to open a discussion to come up with better solutions within the next years, as NICs offloading continue to grow.

The Linux Plumbers Conference was very pleasant and well organized. We had the chance to attend the networking track, seeing lots of great cutting-edge topics being discussed; as well as other interesting tracks.

We’d like to thank the conference and track organizers, we had a great time! Videos, slides and papers are now available on the official website or on Youtube.

Feedback from the Netdev 2.2 conference

The Netdev 2.2 conference took place in Seoul, South Korea. As we work on a diversity of networking topics at Bootlin as part of our Linux kernel contributions, Bootlin engineers Alexandre Belloni and Antoine Ténart went to Seoul to attend lots of interesting sessions and to meet with the Linux networking community. Below, they report on what they learned from this conference, by highlighting two talks they particularly liked.

Linux Networking Dietary Restrictions — slides — video

David S. Miller gave a keynote about reducing the size of core structures in the Linux kernel networking core. The idea behind his work is to use smaller structures which has many benefits in terms of performance as less cache misses will occur and less memory resources are needed. This is especially true in the networking core as small changes may have enormous impacts and improve performance a lot. Another argument from his maintainer hat perspective is the maintainability, where smaller structures usually means less complexity.

He presented five techniques he used to shrink the networking core data structures. The first one was to identify members of common base structures that are only used in sub-classes, as these members can easily be moved out and not impact all the data paths.

The second one makes use of what David calls “state compression”, aka. understanding the real width of the information stored in data structures and to pack flags together to save space. In his mind a boolean should take a single bit whereas in the kernel it requires way more space than that. While this is fine for many uses it makes sense to compress all these data in critical structures.

Then David S. Miller spoke about unused bits in pointers where in the kernel all pointers have 3 bits never used. He argued these bits are 3 boolean values that should be used to reduce core data structure sizes. This technique and the state compression one can be used by introducing helpers to safely access the data.

Another technique he used was to unionize members that aren’t used at the same time. This helps reducing even more the structure size by not having areas of memory never used during identified steps in the networking stack.

Finally he showed us the last technique he used, which was using lookup keys instead of pointers when the objects can be found cheaply based on their index. While this cannot be used for every object, it helped reducing some data structures.

While going through all these techniques he gave many examples to help understanding what can be saved and how it was effective. This was overall a great talk showing a critical aspect we do not always think of when writing drivers, which can lead to big performance improvements.

David S. Miller at Nedev 2.2

WireGuard: Next-generation Secure Kernel Network Tunnel — slides — video

Jason A. Donenfeld presented his new and shiny L3 network tunneling mechanism, in Linux. After two years of development this in-kernel formally proven cryptographic protocol is ready to be submitted upstream to get the first rounds of review.

The idea behind Wireguard is to provide, with a small code base, a simple interface to establish and maintain encrypted tunnels. Jason made a demo which was impressive by its simplicity when securely connecting two machines, while it can be a real pain when working with OpenVPN or IPsec. Under the hood this mechanism uses UDP packets on top of either IPv4 and IPv6 to transport encrypted packets using modern cryptographic principles. The authentication is similar to what SSH is using: static private/public key pairs. One particularly nice design choice is the fact that Wireguard is exposed as a stateless interface to the administrator whereas the protocol is stateful and timer based, which allow to put devices into sleep mode and not to care about it.

One of the difficulty to get Wireguard accepted upstream is its cryptographic needs, which do not match what can provide the kernel cryptographic framework. Jason knows this and plan to first send patches to rework the cryptographic framework so that his module nicely integrates with in-kernel APIs. First RFC patches for Wireguard should be sent at the end of 2017, or at the beginning of 2018.

We look forward to seeing Wireguard hit the mainline kernel, to allow everybody to establish secure tunnels in an easy way!

Jason A. Donenfeld at Netdev 2.2

Conclusion

Netdev 2.2 was again an excellent experience for us. It was an (almost) single track format, running alongside the workshops, allowing to not miss any session. The technical content let us dive deeply in the inner working of the network stack and stay up-to-date with the current developments.

Thanks for organizing this and for the impressive job, we had an amazing time!

Feedback from the Netdev 2.1 conference

At Bootlin, we regularly work on networking topics as part of our Linux kernel contributions and thus we decided to attend our very first Netdev conference this year in Montreal. With the recent evolution of the network subsystem and its drivers capabilities, the conference was a very good opportunity to stay up-to-date, thanks to lots of interesting sessions.

Eric Dumazet presenting “Busypolling next generation”

The speakers and the Netdev committee did an impressive job by offering such a great schedule and the recorded talks are already available on the Netdev Youtube channel. We particularly liked a few of those talks.

Distributed Switch Architecture – slidesvideo

Andrew Lunn, Viven Didelot and Florian Fainelli presented DSA, the Distributed Switch Architecture, by giving an overview of what DSA is and by then presenting its design. They completed their talk by discussing the future of this subsystem.

DSA in one slide

The goal of the DSA subsystem is to support Ethernet switches connected to the CPU through an Ethernet controller. The distributed part comes from the possibility to have multiple switches connected together through dedicated ports. DSA was introduced nearly 10 years ago but was mostly quiet and only recently came back to life thanks to contributions made by the authors of this talk, its maintainers.

The main idea of DSA is to reuse the available internal representations and tools to describe and configure the switches. Ports are represented as Linux network interfaces to allow the userspace to configure them using common tools, the Linux bridging concept is used for interface bridging and the Linux bonding concept for port trunks. A switch handled by DSA is not seen as a special device with its own control interface but rather as an hardware accelerator for specific networking capabilities.

DSA has its own data plane where the switch ports are slave interfaces and the Ethernet controller connected to the SoC a master one. Tagging protocols are used to direct the frames to a specific port when coming from the SoC, as well as when received by the switch. For example, the RX path has an extra check after netif_receive_skb() so that if DSA is used, the frame can be tagged and reinjected into the network stack RX flow.

Finally, they talked about the relationship between DSA and Switchdev, and cross-chip configuration for interconnected switches. They also exposed the upcoming changes in DSA as well as long term goals.

Memory bottlenecks – slides

As part of the network performances workshop, Jesper Dangaard Brouer presented memory bottlenecks in the allocators caused by specific network workloads, and how to deal with them. The SLAB/SLUB baseline performances are found to be too slow, particularly when using XDP. A way from a driver to solve this issue is to implement a custom page recycling mechanism and that’s what all high-speed drivers do. He then displayed some data to show why this mechanism is needed when targeting the 10G network budget.

Jesper is working on a generic solution called page pool and sent a first RFC at the end of 2016. As mentioned in the cover letter, it’s still not ready for inclusion and was only sent for early reviews. He also made a small overview of his implementation.

DDOS countermeasures with XDP – slides #1slides #2 – video #1video #2

These two talks were given by Gilberto Bertin from Cloudflare and Martin Lau from Facebook. While they were not talking about device driver implementation or improvements in the network stack directly related to what we do at Bootlin, it was nice to see how XDP is used in production.

XDP, the eXpress Data Path, provides a programmable data path at the lowest point of the network stack by processing RX packets directly out of the drivers’ RX ring queues. It’s quite new and is an answer to lots of userspace based solutions such as DPDK. Gilberto andMartin showed excellent results, confirming the usefulness of XDP.

From a driver point of view, some changes are required to support it. RX hooks must be added as well as some API changes and the driver’s memory model often needs to be updated. So far, in v4.10, only a few drivers are supporting XDP.

XDP MythBusters – slides – video

David S. Miller, the maintainer of the Linux networking stack and drivers, did an interesting keynote about XDP and eBPF. The eXpress Data Path clearly was the hot topic of this Netdev 2.1 conference with lots of talks related to the concept and David did a good overview of what XDP is, its purposes, advantages and limitations. He also quickly covered eBPF, the extended Berkeley Packet Filters, which is used in XDP to filter packets.

This presentation was a comprehensive introduction to the concepts introduced by XDP and its different use cases.

Conclusion

Netdev 2.1 was an excellent experience for us. The conference was well organized, the single track format allowed us to see every session on the schedule, and meeting with attendees and speakers was easy. The content was highly technical and an excellent opportunity to stay up-to-date with the latest changes of the networking subsystem in the kernel. The conference hosted both talks about in-kernel topics and their use in userspace, which we think is a very good approach to not focus only on the kernel side but also to be aware of the users needs and their use cases.

Bootlin at the Netdev 2.1 conference

Netdev 2.1 is the fourth edition of the technical conference on Linux networking. This conference is driven by the community and focus on both the kernel networking subsystems (device drivers, net stack, protocols) and their use in user-space.

This edition will be held in Montreal, Canada, April 6 to 8, and the schedule has been posted recently, featuring amongst other things a talk giving an overview and the current status display of the Distributed Switch Architecture (DSA) or a workshop about how to enable drivers to cope with heavy workloads, to improve performances.

At Bootlin, we regularly work on networking related topics, especially as part of our Linux kernel contribution for the support of Marvell or Annapurna Labs ARM SoCs. Therefore, we decided to attend our first Netdev conference to stay up-to-date with the network subsystem and network drivers capabilities, and to learn from the community latest developments.

Our engineer Antoine Ténart will be representing Bootlin at this event. We’re looking forward to being there!

Power measurement with BayLibre’s ACME cape

When working on optimizing the power consumption of a board we need a way to measure its consumption. We recently bought an ACME from BayLibre to do that.

Overview of the ACME

The ACME is an extension board for the BeagleBone Black, providing multi-channel power and temperature measurements capabilities. The cape itself has eight probe connectors allowing to do multi-channel measurements. Probes for USB, Jack or HE10 can be bought separately depending on boards you want to monitor.

acme

Last but not least, the ACME is fully open source, from the hardware to the software.

First setup

Ready to use pre-built images are available and can be flashed on an SD card. There are two different images: one acting as a standalone device and one providing an IIO capture daemon. While the later can be used in automated farms, we chose the standalone image which provides user-space tools to control the probes and is more suited to power consumption development topics.

The standalone image userspace can also be built manually using Buildroot, a provided custom configuration and custom init scripts. The kernel should be built using a custom configuration and the device tree needs to be patched.

Using the ACME

To control the probes and get measured values the Sigrok software is used. There is currently no support to send data over the network. Because of this limitation we need to access the BeagleBone Black shell through SSH and run our commands there.

We can display information about the detected probe, by running:

# sigrok-cli --show --driver=baylibre-acme
Driver functions:
    Continuous sampling
    Sample limit
    Time limit
    Sample rate
baylibre-acme - BayLibre ACME with 3 channels: P1_ENRG_PWR P1_ENRG_CURR P1_ENRG_VOL
Channel groups:
    Probe_1: channels P1_ENRG_PWR P1_ENRG_CURR P1_ENRG_VOL
Supported configuration options across all channel groups:
    continuous: 
    limit_samples: 0 (current)
    limit_time: 0 (current)
    samplerate (1 Hz - 500 Hz in steps of 1 Hz)

The driver has four parameters (continuous sampling, sample limit, time limit and sample rate) and has one probe attached with three channels (PWR, CURR and VOL). The acquisition parameters help configuring data acquisition by giving sampling limits or rates. The rates are given in Hertz, and should be within the 1 and 500Hz range when using an ACME.

For example, to sample at 20Hz and display the power consumption measured by our probe P1:

# sigrok-cli --driver=baylibre-acme --channels=P1_ENRG_PWR \
      --continuous --config samplerate=20
FRAME-BEGIN
P1_ENRG_PWR: 1.000000 W
FRAME-END
FRAME-BEGIN
P1_ENRG_PWR: 1.210000 W
FRAME-END
FRAME-BEGIN
P1_ENRG_PWR: 1.210000 W
FRAME-END

Of course there are many more options as shown in the Sigrok CLI manual.

Beta image

A new image is being developed and will change the way to use the ACME. As it’s already available in beta we tested it (and didn’t come back to the stable image). This new version aims to only use IIO to provide the probes data, instead of having a custom Sigrok driver. The main advantage is many software are IIO aware, or will be, as it’s the standard way to use this kind of sensors with the Linux kernel. Last but not least, IIO provides ways to communicate over the network.

A new webpage is available to find information on how to use the beta image, on https://baylibre-acme.github.io. This image isn’t compatible with the current stable one, which we previously described.

The first nice thing to notice when using the beta image is the Bonjour support which helps us communicating with the board in an effortless way:

$ ping baylibre-acme.local

A new tool, acme-cli, is provided to control the probes to switch them on or off given the needs. To switch on or off the first probe:

$ ./acme-cli switch_on 1
$ ./acme-cli switch_off 1

We do not need any additional custom software to use the board, as the sensors data is available using the IIO interface. This means we should be able to use any IIO aware tool to gather the power consumption values:

  • Sigrok, on the laptop/machine this time as IIO is able to communicate over the network;
  • libiio/examples, which provides the iio-monitor tool;
  • iio-capture, which is a fork of iio-readdev designed by BayLibre for an integration into LAVA (automated tests);
  • and many more..

Conclusion

We didn’t use all the possibilities offered by the ACME cape yet but so far it helped us a lot when working on power consumption related topics. The ACME cape is simple to use and comes with a working pre-built image. The beta image offers the IIO support which improved the usability of the device, and even though it’s in a beta version we would recommend to use it.

Yocto project and OpenEmbedded training updated to Krogoth

yocto

Continuing our efforts to keep our training materials up-to-date we just refreshed our Yocto project and OpenEmbedded training course to the latest Yocto project release, Krogoth (2.1.1). In addition to adapting our training labs to the Krogoth release, we improved our training materials to cover more aspects and new features.

The most important changes are:

  • New chapter about devtool, the new utility from the Yocto project to improve the developers’ workflow to integrate a package into the build system or to make patches to existing packages.
  • Improve the distro layers slides to add configuration samples and give advice on how to use these layers.
  • Add a part about quilt to easily patch already supported packages.
  • Explain in depth how file inclusions are handled by BitBake.
  • Improve the description about tasks by adding slides on how to write them in Python.

The updated training materials are available on our training page: agenda (PDF), slides (PDF) and labs (PDF).

Join our Yocto specialist Alexandre Belloni for the first public session of this improved training in Lyon (France) on October 19-21, 2016. We are also available to deliver this training worldwide at your site, contact us!

Factory flashing with U-Boot and fastboot on Freescale i.MX6

Introduction

For one of our customers building a product based on i.MX6 with a fairly low-volume, we had to design a mechanism to perform the factory flashing of each product. The goal is to be able to take a freshly produced device from the state of a brick to a state where it has a working embedded Linux system flashed on it. This specific product is using an eMMC as its main storage, and our solution only needs a USB connection with the platform, which makes it a lot simpler than solutions based on network (TFTP, NFS, etc.).

In order to achieve this goal, we have combined the imx-usb-loader tool with the fastboot support in U-Boot and some scripting. Thanks to this combination of a tool, running a single script is sufficient to perform the factory flashing, or even restore an already flashed device back to a known state.

The overall flow of our solution, executed by a shell script, is:

  1. imx-usb-loader pushes over USB a U-Boot bootloader into the i.MX6 RAM, and runs it;
  2. This U-Boot automatically enters fastboot mode;
  3. Using the fastboot protocol and its support in U-Boot, we send and flash each part of the system: partition table, bootloader, bootloader environment and root filesystem (which contains the kernel image).
The SECO uQ7 i.MX6 platform used for our project.

imx-usb-loader

imx-usb-loader is a tool written by Boundary Devices that leverages the Serial Download Procotol (SDP) available in Freescale i.MX5/i.MX6 processors. Implemented in the ROM code of the Freescale SoCs, this protocol allows to send some code over USB or UART to a Freescale processor, even on a platform that has nothing flashed (no bootloader, no operating system). It is therefore a very handy tool to recover i.MX6 platforms, or as an initial step for factory flashing: you can send a U-Boot image over USB and have it run on your platform.

This tool already existed, we only created a package for it in the Buildroot build system, since Buildroot is used for this particular project.

Fastboot

Fastboot is a protocol originally created for Android, which is used primarily to modify the flash filesystem via a USB connection from a host computer. Most Android systems run a bootloader that implements the fastboot protocol, and therefore can be reflashed from a host computer running the corresponding fastboot tool. It sounded like a good candidate for the second step of our factory flashing process, to actually flash the different parts of our system.

Setting up fastboot on the device side

The well known U-Boot bootloader has limited support for this protocol:

The fastboot documentation in U-Boot can be found in the source code, in the doc/README.android-fastboot file. A description of the available fastboot options in U-Boot can be found in this documentation as well as examples. This gives us the device side of the protocol.

In order to make fastboot work in U-Boot, we modified the board configuration file to add the following configuration options:

#define CONFIG_CMD_FASTBOOT
#define CONFIG_USB_FASTBOOT_BUF_ADDR       CONFIG_SYS_LOAD_ADDR
#define CONFIG_USB_FASTBOOT_BUF_SIZE          0x10000000
#define CONFIG_FASTBOOT_FLASH
#define CONFIG_FASTBOOT_FLASH_MMC_DEV    0

Other options have to be selected, depending on the platform to fullfil the fastboot dependencies, such as USB Gadget support, GPT partition support, partitions UUID support or the USB download gadget. They aren’t explicitly defined anywhere, but have to be enabled for the build to succeed.

You can find the patch enabling fastboot on the Seco MX6Q uQ7 here: 0002-secomx6quq7-enable-fastboot.patch.

U-Boot enters the fastboot mode on demand: it has to be explicitly started from the U-Boot command line:

U-Boot> fastboot

From now on, U-Boot waits over USB for the host computer to send fastboot commands.

Using fastboot on the host computer side

Fastboot needs a user-space program on the host computer side to talk to the board. This tool can be found in the Android SDK and is often available through packages in many Linux distributions. However, to make things easier and like we did for imx-usb-loader, we sent a patch to add the Android tools such as fastboot and adb to the Buildroot build system. As of this writing, our patch is still waiting to be applied by the Buildroot maintainers.

Thanks to this, we can use the fastboot tool to list the available fastboot devices connected:

# fastboot devices

Flashing eMMC partitions

For its flashing feature, fastboot identifies the different parts of the system by names. U-Boot maps those names to the name of GPT partitions, so your eMMC normally requires to be partitioned using a GPT partition table and not an old MBR partition table. For example, provided your eMMC has a GPT partition called rootfs, you can do:

# fastboot flash rootfs rootfs.ext4

To reflash the contents of the rootfs partition with the rootfs.ext4 image.

However, while using GPT partitioning is fine in most cases, i.MX6 has a constraint that the bootloader needs to be at a specific location on the eMMC that conflicts with the location of the GPT partition table.

To work around this problem, we patched U-Boot to allow the fastboot flash command to use an absolute offset in the eMMC instead of a partition name. Instead of displaying an error if a partition does not exists, fastboot tries to use the name as an absolute offset. This allowed us to use MBR partitions and to flash at defined offset our images, including U-Boot. For example, to flash U-Boot, we use:

# fastboot flash 0x400 u-boot.imx

The patch adding this work around in U-Boot can be found at 0001-fastboot-allow-to-flash-at-a-given-address.patch. We are working on implementing a better solution that can potentially be accepted upstream.

Automatically starting fastboot

The fastboot command must be explicitly called from the U-Boot prompt in order to enter fastboot mode. This is an issue for our use case, because the flashing process can’t be fully automated and required a human interaction. Using imx-usb-loader, we want to send a U-Boot image that automatically enters fastmode mode.

To achieve this, we modified the U-Boot configuration, to start the fastboot command at boot time:

#define CONFIG_BOOTCOMMAND "fastboot"
#define CONFIG_BOOTDELAY 0

Of course, this configuration is only used for the U-Boot sent using imx-usb-loader. The final U-Boot flashed on the device will not have the same configuration. To distinguish the two images, we named the U-Boot image dedicated to fastboot uboot_DO_NOT_TOUCH.

Putting it all together

We wrote a shell script to automatically launch the modified U-Boot image on the board, and then flash the different images on the eMMC (U-Boot and the root filesystem). We also added an option to flash an MBR partition table as well as flashing a zeroed file to wipe the U-Boot environment. In our project, Buildroot is being used, so our tool makes some assumptions about the location of the tools and image files.

Our script can be found here: flash.sh. To flash the entire system:

# ./flash.sh -a

To flash only certain parts, like the bootloader:

# ./flash.sh -b 

By default, our script expects the Buildroot output directory to be in buildroot/output, but this can be overridden using the BUILDROOT environment variable.

Conclusion

By assembling existing tools and mechanisms, we have been able to quickly create a factory flashing process for i.MX6 platforms that is really simple and efficient. It is worth mentioning that we have re-used the same idea for the factory flashing process of the C.H.I.P computer. On the C.H.I.P, instead of using imx-usb-loader, we have used FEL based booting: the C.H.I.P indeed uses an Allwinner ARM processor, providing a different recovery mechanism than the one available on i.MX6.