Installing Ubuntu 10.04 on the IGEPv2 board. Using the board as a small server.
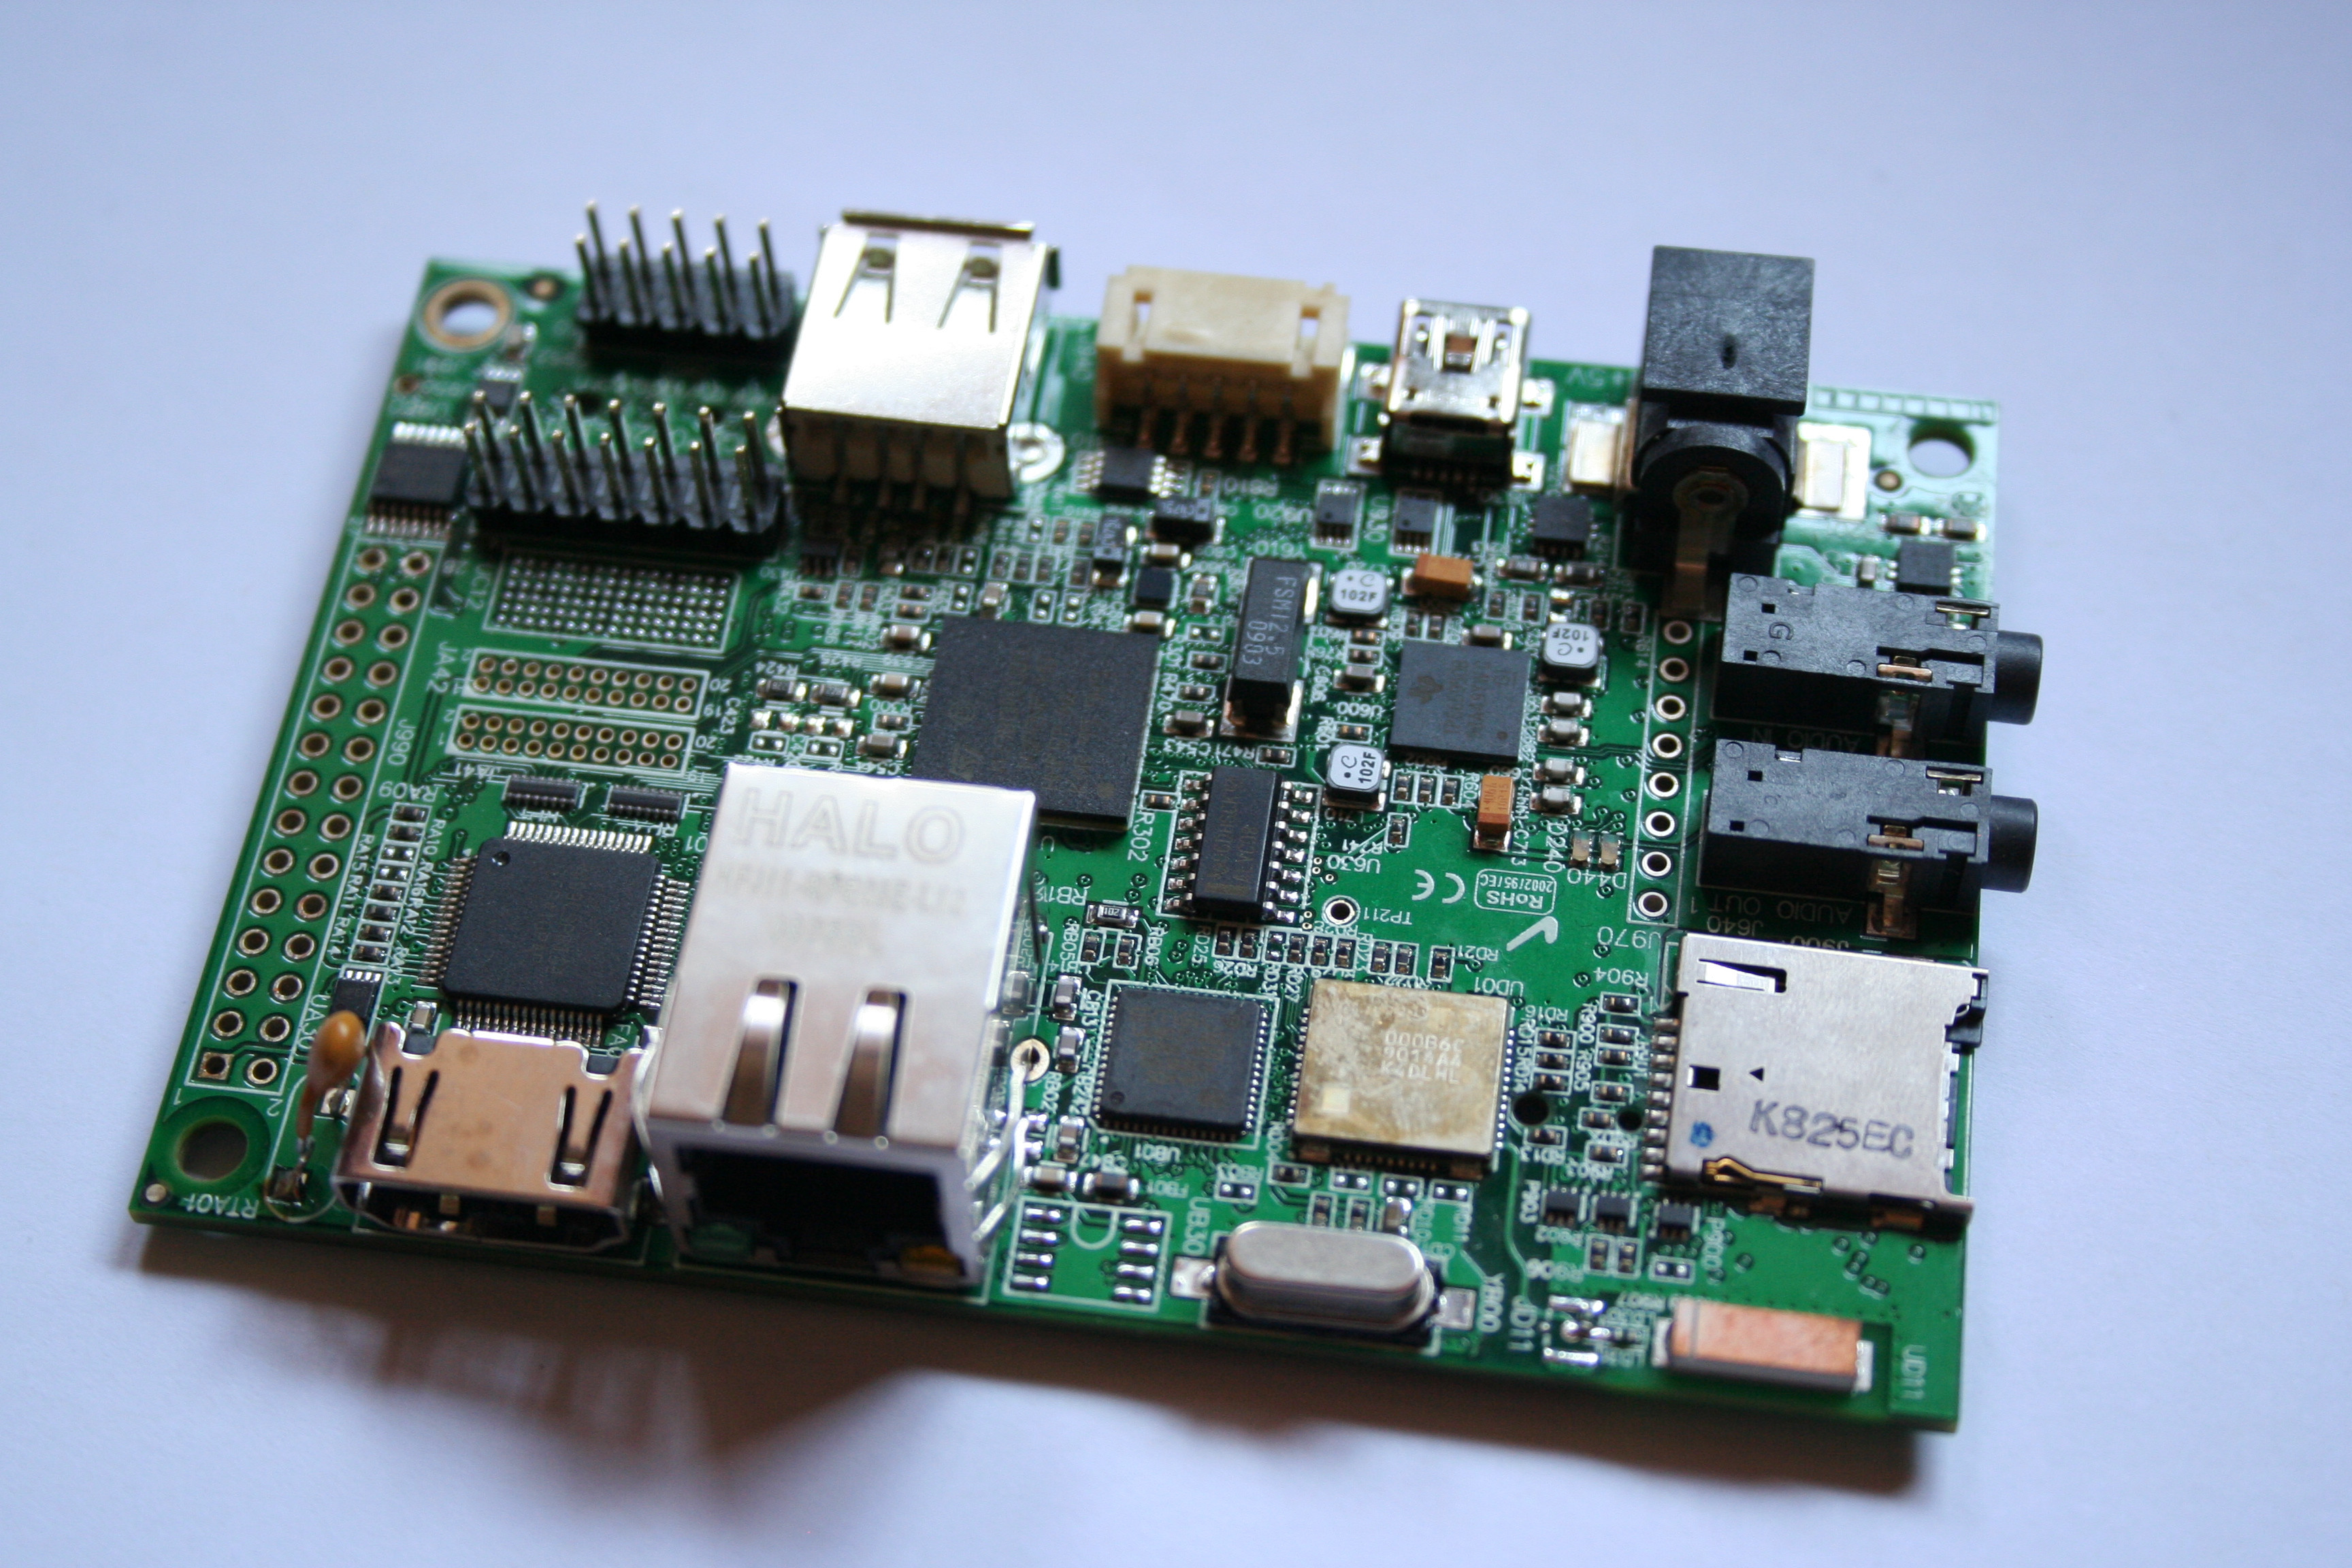 Last year, folks at Texas Instruments told me about the IGEP v2 board. This board is similar to the Beagle board, but also features 512 MB of RAM and NAND flash (instead of 256 for the Beagle), on board Ethernet (RJ45), Wi-Fi and Bluetooth, all this for only 145 €! Its fast ARM CPU (TI OMAP 3530 running at 720 MHz) and graphical capabilities allow it to be used in for services usually performed by desktop or server CPUs.
At the Bootlin main office, we needed a server to share files, create backups and upload these backups to our servers on the Internet. I decided to use the Ubuntu 10.04 distribution on ARM, based on Debian GNU/Linux. As I didn’t find all the details I needed on the IGEP community website, here are the steps that I took. Several details were found on the http://labs.igep.es/index.php/How_to_get_the_Ubuntu_distribution page though.
This page assumes that you are familiar with building the Linux kernel, controlling an embedded board from a serial line and booting it, and using the GNU/Linux system in general (see the training materials from our embedded Linux course). Beginners may be lost because we don’t give all the details, but more experienced developers should just find the board specific details that they need.
First, get an SD card (at least 2 GB), and prepare its partitions with the mkcard.sh utility.
To compile your kernel, get a CodeSourcery toolchain for ARM. I used the 2010q1 release. Install it in /usr/local/CodeSourcery/arm-2010q1/ (for example)
Get the kernel sources:
$ mkdir $HOME/igep
$ cd $HOME/igep
$ git clone git://git.igep.es/pub/scm/linux-omap-2.6.git
$ cd linux-omap-2.6/
Let’s switch to the latest stable version:
$ git tag
v2.6.28.10-3
v2.6.28.10-igep0020b-0
v2.6.28.10-igep0020b-1
v2.6.28.10-igep0020b-2
v2.6.33.2-0
v2.6.33.4-0
$ git checkout -b v2.6.33.4-0 v2.6.33.4-0
Checking out files: 100% (13116/13116), done.
Switched to a new branch 'v2.6.33.4-0'
Now, set the environment variables for cross-compiling the kernel sources to the arm architecture:
$ export PATH=/usr/local/CodeSourcery/arm-2010q1/bin:$PATH
$ export ARCH=arm
$ export CROSS_COMPILE=arm-none-linux-gnueabi-
Now, take the default configuration for the board and build your kernel:
$ make help | grep igep
$ make igep0020_defconfig
$ make -j 4
$ make uImage
It’s time to build your Ubuntu filesystem, using the Rootstock utility:
$ tar zxvf rootstock-0.1.99.3.tar.gz
$ cd rootstock-0.1.99.3
$ sudo ./rootstock --fqdn igepv2 --login mike --password letmein \
  --imagesize 2G --seed build-essential,openssh-server --dist lucid
Copy the kernel to the first partition of your SD card:
cp arch/arm/boot/uImage /media/boot/
cp .config /media/boot/config-2.6.33.4
Install the root filesystem on the second partition of your SD card:
$ cd /media/rootfs/
$ sudo tar zxvf $HOME/igep/rootstock-0.1.99.3/armel-rootfs-201006102239.tgz
Configure the rootfs to let you log in on the serial console (ttyS2 with OMAP). Do this by copying etc/init/tty1.conf to etc/init/ttyS2.conf and replacing tty1 by ttyS2 in this file.
Install kernel modules manually for the first time:
$ mkdir -p /lib/modules
$ cd $HOME/igep/linux-omap-2.6/
$ make INSTALL_MOD_PATH=/media/rootfs modules_install
In the Rootstock version I tested, the specified user didn’t get created (bug report). To be able to log in, I had to disable the root password by removing the first * character in the root entry in etc/shadow:
We are now ready to boot our new system. First, unmount your SD card partitions:
$ sudo umount /media/boot
$ sudo umount /media/rootfs
Insert your SD card in the slot on your board, connect your serial cable and in the U-boot prompt on the serial line, configure the kernel boot parameters:
$ setenv bootargs mem=512M console=ttyS2,115200n8 root=/dev/mmcblk0p2 rw rootwait
$ setenv bootcmd 'mmc init 0 ; fatload mmc 0 80000000 uImage ; bootm 80000000'
$ setenv autostart yes
$ saveenv
$boot
You should see your Linux kernel boot and get to a login shell. Log in as root with no password.
It is now time for the final tweaks. First, create a non root user (remember the Rootstock bug), allow it to run the sudo command, and choose a root password too:
adduser mike
adduser mike sudo
passwd
Let’s cope with a last Rootstock bug. Add the updates and security repositories to /etc/apt/sources.list:
deb http://ports.ubuntu.com/ubuntu-ports lucid-updates main
deb http://ports.ubuntu.com/ubuntu-ports lucid-security main
Without this, you would miss package updates and security releases, and your packages would never change!
If you use the IGEP board as a server as I do, you may need your server to have a fixed MAC address. The trouble is the e2prom storing the MAC address is not populated by default, and every time you boot, the kernel gives you a random MAC address.
The easiest fix I found was to choose an arbitrary MAC address (you can take the first random one that you get), and force it in /etc/network/interfaces:
auto eth0
iface eth0 inet dhcp
hwaddress ether 00:01:04:1b:2C:1F
As the IGEPv2 board doesn’t have a battery by default, it won’t be able to keep the correct time. You can use the ntp daemon to address this:
sudo apt-get install ntp
Your configuration should now be complete. You can now use your IGEPv2 board as a tiny, ultra low power server with Ubuntu server. All the rest is ordinary Debian / Ubuntu server administration. Of course, you can also install desktop packages and use your board as a desktop replacement (you may need to add kernel command line settings for graphics). Have fun!
By the way, the IGEPv2 board is not the best solution if you all you need is a server. The amazing graphical capabilities of the OMAP chip would just be useless. For a server, better, cheaper and more powerful alternatives are the SheevaPlug and GuruPlug. Don’t miss these very nice devices!
Bluetooth and wireless are untested with the kernel version I used. They probably don’t work, apparently because of a firmware loading issue. I haven’t had the time and need to investigate yet.
If you use your board as an NFS server on Ubuntu 10.04, I advise you to remove the following lines in
/etc/init.d/nfs-kernel-server:# See if our running kernel supports the NFS kernel server
if [ -f /proc/kallsyms ] && ! grep -qE ‘ nfsd_serv ‘ /proc/kallsyms; then
log_warning_msg “Not starting $DESC: no support in current kernel.”
exit 0
fi
Otherwise, your server won’t start. It’s because the
/proc/kallsymscontents in Linux 2.6.33 or different from those in 2.6.32, the kernel version supported by Ubuntu 10.04.After the first boot, I advise you to handle kernel updates with Debian packages. In the kernel sources, run:
make deb-pkg
This will give you two
.debthat you will be able to upload to your server and install with thedpkg -icommand.However, you will still have to copy the uImage files manually to the first partition of your SD card. You can do it from your server itself, of course.
In case you have trouble using Rootstock (this tool isn’t rock solid yet), you could use the .tgz file I generated with it: /pub/ubuntu/armel-rootfs-201006102239.tgz.
Once you have built the rootfs or downloaded the armel-rootfs.tgz file you will need to disable the ureadahead daemon or your igep will just stall half way through the boot process. This is ok because ureadahead is actually for booting from a spinning hard disk not an SSD
To disable it you can go into /etc/init on your rootfs and rename the ureadahead.conf to ureadahead.disabled
Also when you are copying the file /etc/init/tty1 to ttyS2 you need to change the line speed
so your new ttyS2 file should look like
exec /sbin/getty -8 115200 ttyS2
so it matches with the igep port speed which defaults to 115200 8 n 1
Hi mike and thanks for this very good tutorial,
I’ve only a problem (error) during compilation of the kernel (just for the modules part compilation) :
– the kernel : vmlinux and uImage are correctly compiled (kernel work in nfs mode)
– but during its compilation I’ve got :
  CC [M]  fs/binfmt_aout.o

  fs/binfmt_aout.c: In function 'load_aout_binary':

  fs/binfmt_aout.c:272: error: 'SEGMENT_SIZE' undeclared (first use in this function)

  fs/binfmt_aout.c:272: error: (Each undeclared identifier is reported only once

  fs/binfmt_aout.c:272: error: for each function it appears in.)

  make[1]: *** [fs/binfmt_aout.o] Erreur 1
provide that no module compiled.
Same error and result while do a “make modules” and don’t understand the reason.
Any Idea ?
Thanks and see you 🙂
Thanks for this helpful tutorial!
I had a lot of problems to get a working combination of different Ubuntu host versions, rootstock versions etc., but finally succeeded with Ubuntu 9.10 and a manually replaced rootstock script (the automatically installed one does not work). Unfortunately I could not find any documentation about the way, this rootstock-Qemu-stuff really works, and so it’s quite mysterious, and if something does not work, there is not much one can do except trying other versions of Ubuntu, of Qemu, of rootstock and of all the other little tools involved.
Now there is one problem left: I did my tests with reading the Linux kernel from tftp and the rootfs from nfs (as described by the board manufacturer), and I am noticing a very long boot delay (about twenty seconds) that seems to be caused by the mountall command which seems to be part of the upstart mechanism and written by the same person. The man page does not tell much, if at all, but the other Linux versions provided from the board manufacturer do not use the upstart mechanism and boot much faster.
I also did some tests with the bootchart utility, but its python script intended to generate the png is quite unstable and more crashes than works. Additionally, this is not of much use, because the bootstart process seems to be started after mountall.
If I have enough time I will have a look at mountall’s source code, otherwise I think that the old fashioned init method is more reliable than upstart with its mountall interim solution (as the short man page states).
Mmm, 20 seconds in mountall is a long time.
From my experience, long idle durations like 20 seconds are sometimes caused by a timeout. Something fails to work for almost 20 seconds, and something else is tried and succeeds.
Could this be an attempt to use ipv6 to mount the rootfs (in some networks, ipv6 is not supported), and then falling back to ipv4 which would succeed?
This is just a very rough guess. There could be so many causes…
I had the same idea, so I disabled IPv6 (at least I tried to and got no more “no IPv6 routers present” messages), but without any effect. However, it’s likely a kind of timeout, and I am rather sure it’s a flaw in the mountall program.
Another symptom: The mountall program creates very many (about 2500) child processes (their process IDs start with about 500 and go up to about 3000). So my current guess is that mountall is forking like crazy, which of course eats a lot of time on a relatively slow system.
There are other reports about mountall, written by people who are not completely satisfied with the command and its documentation, but I have no idea, if they are objective and dispassionate.
adding “–verbose” to the mountall command reveals:
…
mounting /dev
mount /dev [524] exited normally
…
mounting /dev/pts
# takes # very # long # time #
mount /dev/pts [2956] exited normally
…
So it seems as if mountall creates a huge amount of child processes just to mount “/dev/pts”. Afterwards the boot process seems to proceed normally.
$ make INSTALL_MOD_PATH=/media/rootfs modules_install
is building x86, not arm???
what module file to use to make module for my target?
Thanks!
Hi,
It should build for arm thanks to this environment setting:
export ARCH=arm
The export ARCH=arm did not helped in my case, I had to do it this way:
$ sudo make ARCH=arm INSTALL_MOD_PATH=/media/rootfs modules_install
That is because export is on user-level (without sudo). And you used: sudo make. So then $export is not set, default will be x86.
Nice guide!
But I have one problem: After doing the configurtaion in DasUBoot the kernel does not boot any more:
Hit any key to stop autoboot: 3 2 1 0
mmc0 is available
reading uImage
2716704 bytes read
U-Boot #
and nothing happens. I have the normal uboot terminal. Typing “boot” I get the same messages again and I am back in the terminal.
I think you have to type “bootm” to boot from the image loaded in memory, if you don’t want to type it each time you boot the board, then you can add bootm at the end of bootcmd :
$ setenv bootcmd ‘mmc init 0 ; fatload mmc 0 80000000 uImage ; bootm’
$ saveenv
$ boot
Thanks. I fixed the instructions. What happened was that I probably had
autostart=yesin my U-boot environment, and you probably didn’t. When you have this,bootm ${fileaddr}is automatically run after a download with commands likefatload,nbootandtftpboot.Hello!
I’m a student and I have a project that goes like this, I have a USB flash drive which will be connected to a circuit(I’m planning to use this IGEPv2 board) wherein my mobile phone can access the files of the flash drive, move, send to and from via bluetooth using FTP. Does IGEPv2 support this?
I hope this is the solution to my problem.
Thanks in advance. Hope someone will reply.
Hi all,
Great tutorial Michael! Question though for you and anyone else that can answer it. How would I go about adding desktop packages to the above steps?
Thanks!
Andrew
I think it’s sudo ./rootstock –fqdn igepv2 –login mike –password letmein
–imagesize 2G –seed xubuntu-desktop –dist lucid, is that right?
Hi! Thanks for your tutorial. I followed all steps, but when I insert de card in the board and connect it I can show throw the serial console:
IGEP-X-Loader 2.1.0-2 (Jul 20 2011 – 12:19:10)
XLoader: CPU OMAP3530
Scanning JFFS2 FS: . done.
And blocks at this point… dont load the kernel.. what can be the problem?
A lot of thaks, Adrian!
I solved the anterior problem. Now, my kernel is loading, but it stops at this point:
[ 17.323150] kjournald starting. Commit interval 5 seconds
[ 17.567810] EXT3-fs (mmcblk0p2): using internal journal
[ 17.573120] EXT3-fs (mmcblk0p2): recovery complete
[ 17.823211] EXT3-fs (mmcblk0p2): mounted filesystem with ordered data mode
[ 17.830230] VFS: Mounted root (ext3 filesystem) on device 179:2.
[ 17.836364] Freeing init memory: 160K
[ 30.083129] libertas: can’t load helper firmware
[ 30.083129] libertas: failed to load helper firmware
please help me, I need this kernel to finish my degree this week..A lot of thanks,
Adrian.