KernelShark 1.0; What’s new and what’s coming, by Steven Rostedt – VMware
The first day, one of the most enjoyable talk was “KernelShark 1.0; What’s new and what’s coming”. One reason is the speaker itself, Steven Rostedt, who is very experienced in presenting. He always knows very well the approached subject and does a few jokes during the talk: all of these lead to a very pleasant talk.
From my point of view, the talk itself presents two interesting subjects: the process of developing a tool’s front end (with trace-cmd being the example) and then a presentation of this GUI.
Talk chosen by Grégory
Atomic explosion: evolution and use of relaxed concurrency primitives, by Will Deacon – ARM
On the second day, Will Deacon talked about an interesting topic “Atomic explosion: evolution and use of relaxed concurrency primitives”. As usual with Will, the technical level is high and seeing the video a second time is recommended to really put the multiple pieces of information together.
Besides the explanations on the atomic operation and their meaning from the point of view of the CPUs, Will also presented his new API, how and when we should use it.
Talk chosen by Grégory
Coccinelle: 10 Years of Automated Evolution in the Linux Kernel, by Julia Lawall – INRIA/LIP6
Happy birthday, Coccinelle!
It has been 10 years that this project is helping kernel developers to track bugs or clean the kernel up. For this event, Julia did a retrospective and a “what’s new” of this project.
Initially used only by Coccinelle developers, it was quickly adopted by all the kernel community. It was interesting to have the history, feedback and also updates on this project that is more and more used now.
Talk chosen by Mylène
Meltdown and Spectre: seeing through the magician’s tricks, by Paolo Bonzini – Red Hat
Paolo Bonzini did a great presentation about Meltdown and Spectre with a detailed description of the different mechanisms taken advantage of by these two issues: branch prediction, memory mapping, paging, etc.
It was a great overview and well explained.
Talk chosen by Mylène
The end word
As usual at Kernel Recipes, Frank Tizzoni is in the room to draw sketches of attendees and speakers! Have a look at all the sketches! Some of them are really funny 🙂
It is the first time we attended the Kernel Recipes and this conference is as good as the feedback we received from people who were in the previous editions.
The major points are the high quality of the talks, the interaction between the speaker and the audience but also the social events around it.
Boris and Grégory
It is the second time that I attended Kernel Recipes and I am still convinced that this conference is really nice.
The talks, the audience, the format (limited to 100 people) and all social events are great!
My only regret is that I was not able to attend Embedded Recipes to enjoy a bit more the ambiance around these two conferences.
I hope to register in time next year! 😉
Recently, our customer Senic asked us to integrate an Over-The-Air (OTA) mechanism in their embedded Linux system, and after some discussion, they ended up chosing Mender. This article will detail an example of Mender’s integration and how to use it.
What is Mender?
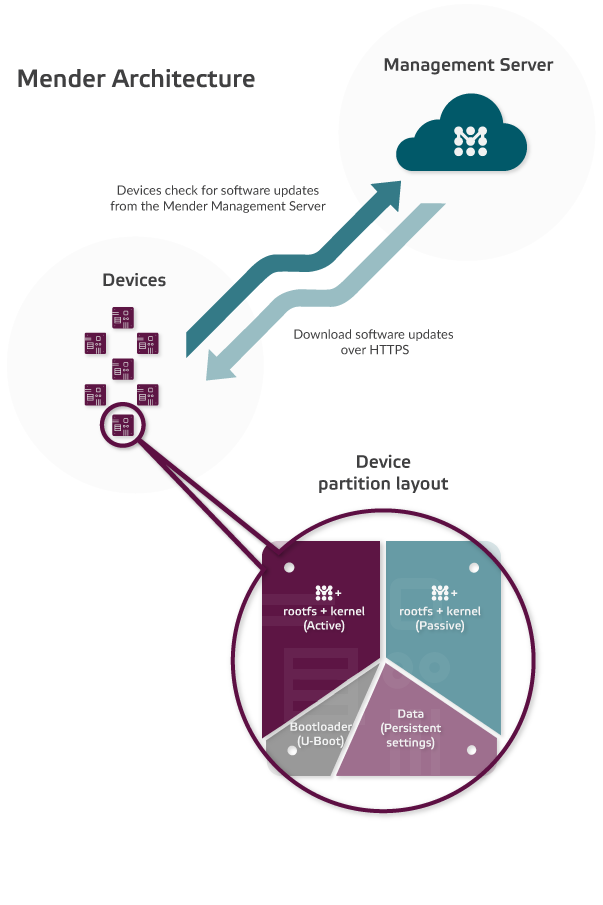
Mender is an open source remote updater for embedded devices. It is composed of a client installed on the embedded device, and a management server installed on a remote server. However, the server is not mandatory as Mender can be used standalone, with updates triggered directly on the embedded device.
In order to offer a fallback in case of failure, Mender uses the double partition layout: the device will have at least 2 rootfs partitions, one active and one inactive. Mender will deploy an update on the inactive partition, so that in case of an error during the update process, it will still have the active partition intact. If the update succeeds, it will switch to the updated partition: the active partition becomes inactive and the inactive one becomes the new active. As the kernel and the device tree are stored in the /boot folder of the root filesystem, it is possible to easily update an entire system. Note that Mender needs at least 4 partitions:
bootloader partition
data persistent partition
rootfs + kernel active partition
rootfs + kernel inactive partition
It is, of course, customizable if you need more partitions.
Two reference devices are supported: the BeagleBone Black and a virtual device. In our case, the board was a Nanopi-Neo, which is based on an Allwinner H3.
Mender provides a Yocto Project layer containing all the necessary classes and recipes to make it work. The most important thing to know is that it will produce an image ready to be written to an SD card to flash empty boards. It will also produce “artifacts” (files with .mender extension) that will be used to update an existing system.
Installation and setup
In this section, we will see how to setup the Mender client and server for your project. Most of the instructions are taken from the Mender documentation that we found well detailed and really pleasant to read. We’ll simply summarize the most important steps.
Server side
The Mender server will allow you to remotely update devices. The server can be installed in two modes:
demo mode: Used to test a demo server. It can be nice to test it if you just want to quickly deploy a Mender solution, for testing purpose only. It includes a demo layer that simplify and configure for you a default Mender server on localhost of your workstation.
production mode: Used for production. We will focus on this mode as we wanted to use Mender in a production context. This mode allows to customize the server configuration: IP address, certificates, etc. Because of that, some configuration will be necessary (which is not the case in the demo mode).
In order to install the Mender server, you should first install Docker CE and Docker Compose. Have a look at the corresponding Docker instructions.
This final configuration will link the generated keys with the Mender server. All the modifications will be in the prod.yml file.
Locate the storage-proxy service in prod.yml and set it to your domain name. In our case s3.foobar.com under the networks.mender.aliases
Locate the minio service. Set MINIO_ACCESS_KEY to “mender-deployments” and the MINIO_SECRET_KEY to a generated password (with e.g.: $ apg -n1 -a0 -m32)
Locate the mender-deployments service. Set DEPLOYMENTS_AWS_AUTH_KEY and DEPLOYMENTS_AWS_AUTH_SECRET to respectively the value of MINIO_ACCESS_KEY and MINIO_SECRET_KEY. Set DEPLOYMENTS_AWS_URI to point to your domain such as https://s3.foobar.com:9000
Start the server
Make sure that the domain names you have defined (mender.foobar.com and s3.foobar.com) are accessible, potentially by adding them to /etc/hosts if you’re just testing.
Start the server
$ ./run up -d
If it is a new installation, request initial user login:
$ curl -X POST -D - --cacert keys-generated/certs/api-gateway/cert.crt https://mender.foobar.com:443/api/management/v1/useradm/auth/login
Check that you can create a user and login to mender UI:
$ firefox http://mender.foobar.com:443
Client side – Yocto Project
Mender has a Yocto Project layer to easily interface with your own layer.
We will see how to customize your layer and image components (U-Boot, Linux kernel) to correctly configure it for Mender use.
In this section, we will assume that you have your own U-Boot and your own kernel repositories (and thus, recipes) and that you retrieved the correct branch of this layer.
Machine and distro configurations
Make sure that the kernel image and Device Tree files are installed in the root filesystem image
By default, Mender assumes that your storage device is /dev/mmcblk0, that mmcblk0p1 is your boot partition (containing the bootloader), that mmcblk0p2 and mmcblk0p3 are your two root filesystem partitions, and that mmcblk0p5 is your data partition. If that’s the case for you, then everything is fine! However, if you need a different layout, you need to update your machine configuration. Mender’s client will retrieve which storage device to use by using the MENDER_STORAGE_DEVICE variable (which defaults to mmcblk0). The partitions themselves should be specified using MENDER_BOOT_PART, MENDER_ROOTFS_PART_A, MENDER_ROOTFS_PART_B and ROOTFS_DATA_PART. If you need to change the default storage or the partitions’ layout, edit in your machine configuration the different variables according to your need. Here is an example for /dev/sda:
Do not forget to update the artifact name in your local.conf, for example:
MENDER_ARTIFACT_NAME = "release-1"
As described in Mender’s documentation, Mender will store the artifact name in its artifact image. It must be unique which is what we expect because an artifact will represent a release tag or a delivery. Note that if you forgot to update it and upload an artifact with the same name as an existing in the web UI, it will not be taken into account.
U-Boot configuration tuning
Some modifications in U-Boot are necessary to be able to perform the rollback (use a different partition after an unsuccessful update)
Mender needs BOOTCOUNT support in U-Boot. It creates a bootcount variable that will be incremented each time a reboot appears (or reset to 1 after a power-on reset). Mender will use this variable in its rollback mechanism.
Make sure to enable it in your U-Boot configuration. This will most likely require a patch to your board .h configuration file, enabling:
The BOOTENV_SIZE must be set the same content as the U-Boot CONFIG_ENV_SIZE variable. It will be used by the u-boot-fw-utils tool to retrieve the U-Boot environment variables.
Mender is using u-boot-fw-utils so make sure that you have a recipe for it and that Mender include’s file is included. To do that, you can create a bbappend file on the default recipe or create your own recipe if you need a specific version. Have a look at Mender’s documentation example.
Tune your U-Boot environment to use Mender’s variables. Here are some examples of the modifications to be done. Set the root= kernel argument to use ${mender_kernel_root}, set the bootcmd to load the kernel image and Device Tree from ${mender_uboot_root} and to run mender_setup. Make sure that you are loading the Linux kernel image and Device Tree file from the root filesystem /boot directory.
As stated in the introduction, Mender has a client, in the form of a userspace application, that will be used on the target. Mender’s layer has a Yocto recipe for it but it does not have our server certificates. To establish a connection between the client and the server, the certificates have to be installed in the image. For that, a bbappend recipe will be created. It will also allow to perform additional Mender configuration, such as defining the server URL.
Copy your server certificates in the bbappend recipe folder
Recompile an image and now, we should have everything we need to be able to update an image. Do not hesitate to run the integration checklist, it is really a convenient way to know if everything is correctly configured (or not).
If you want to be more robust and secure, you can sign your artifacts to be sure that they come from a trusted source. If you want this feature, have a look at this documentation.
Usage
Standalone mode
To update an artifact using the standalone mode (i.e. without server), here are the commands to use. You will need to update them according to your needs.
On your work station, create a simple HTTP server in your Yocto deploy folder:
$ python -m SimpleHTTPServer
On the target, start mender in standalone mode
$ mender -log-level info -rootfs http://192.168.42.251:8000/foobar.mender
You can also use the mender command to start an update from a local .mender file, provided by a USB key or SD card.
Once finished, you will have to reboot the target manually
$ reboot
After the first reboot, you will be on the the new active partition (if the previous one was /dev/mmcblk0p2, you should be on /dev/mmcblk0p3). Check the kernel version, artifact name or command line:
$ uname -a
$ cat /etc/mender/artifact_info
$ cat /proc/cmdline
If you are okay with this update, you will have to commit the modification otherwise the update will not be persistent and once you will reboot the board, Mender will rollback to the previous partition:
$ mender -commit
Using Mender’s server UI
The Mender server UI provides a management interface to deploy updates on all your devices. It knows about all your devices, their current software version, and you can plan deployments on all or a subset of your devices. Here are the basic steps to trigger a deployment:
Login (or create an account) into the mender server UI: https://mender.foobar.com:443
Power-up your device
The first time, you will have to authorize the device. You will find it in your “dashboard” or in the “devices” section.
After authorizing it, it will retrieve device information such as current software version, MAC address, network interface, and so on
To update a partition, you will have to create a deployment using an artifact.
Upload the new artifact in the server UI using the “Artifacts” section
Deploy the new artifact using the “deployment” or the “devices” section. You will retrieve the status of the deployment in the “status” field. It will be in “installing”, “rebooting”, etc. The board will reboot and the partition should be updated.
Troubleshooting
Here are some issues we faced when we integrated Mender for our device. The Mender documentation also has a troubleshooting section so have a look at it if you are facing issues. Otherwise, the community seems to be active even if we did not need to interact with it as it worked like a charm when we tried it.
Update systemd’s service starting
By default, the Mender systemd service will start after the service “resolved” the domain name. On our target device, the network was available only via WiFi. We had to wait for the wlan0 interface to be up and configured to automatically connect a network before starting Mender’s service. Otherwise, it leads to an error due to the network being unreachable. To solve this issue which is specific to our platform, we set the systemd dependencies to “network-online.target” to be sure that a network is available:
It now matches our use case because the Mender service will start only if the wlan0 connection is available and working.
Certificate expired
The certificates generated and used by Mender have a validity period. In case your board does not have a RTC set, Mender can fail with the error:
systemctl status mender
[...]
... level=error msg="authorize failed: transient error: authorization request failed: failed to execute authorization request:
Post https:///api/devices/v1/authentication/auth_requests: x509: certificate has expired or is not yet valid" module=state
To solve this issue, update the date on your board and make sure your RTC is correctly set.
Device deletion
While testing Mender’s server (version 1.0), we always used the same board and got into the issue that the board was already registered in the Server UI but had a different Device ID (which is used by Mender to identify devices). Because of that, the server was always rejecting the authentication. The next release of the Mender server offers the possibility to remove a device so we updated the Mender’s server to the last version.
Deployments not taken into account
Note that the Mender’s client is checking by default every 30 minutes if a deployment is available for this device. During testing, you may want to reduce this period, which you can in the Mender’s configuration file using its UpdatePollIntervalSeconds variable.
Conclusion
Mender is an OTA updater for Embedded devices. It has a great documentation in the form of tutorials which makes the integration easy. While testing it, the only issues we got were related to our custom platform or were already indicated in the documentation. Deploying it on a board was not difficult, only some U-Boot/kernel and Yocto Project modifications were necessary. All in all, Mender worked perfectly fine for our project!
Thanks to Microcrystal, a Switzerland-based real-time clock vendor, Free-Electrons has contributed support for a number of new I2C and SPI based real-time clocks to the Linux kernel over the last few months. More specifically, we added or improved support for the Microcrystal RV-1805, RV-4162, RV-3029 and RV-3049. In this blog post, we detail the contributions we have done to support those real-time clocks.
RV-1805
The RV-1805 RTC is similar to the Abracon 1805 one, for which a driver already existed in the Linux kernel. Therefore, the support for the RV-1805 RTC was added in the same driver, rtc-abx80x.c. The patch which adds the support of this RTC is already upstream since v4.5 (see Free-Electrons contributions to linux 4.5). In this kernel version, the support of the alarm has also been added. In the 4.6 kernel release, the support for two additional functionalities has been contributed: oscillator selection and handling of oscillator failure.
The oscillator selection functionality allows to select between the two oscillators available in this RTC:
The XT oscillator, a more stable, but also more power-hungy oscillator
The RC oscillator, a less accurate, but also more power-efficient oscillator
This patch adds the possibility to select which oscillator the RTC should use and also, a way to configure the auto-calibration (auto-calibration is a feature to calibrate the RC oscillator using the digital XT oscillator).
To select the oscillator, a sysfs entry has been added:
cat /sys/class/rtc/rtc0/device/oscillator
To configure and activate the autocalibration, another sysfs entry has been added:
cat /sys/class/rtc/rtc0/device/autocalibration
Here is an example of using RC oscillator and an autocalibration of 512 seconds cycle.
The other functionality that was added is handling the Oscillator Failure situation (see this patch). The Oscillator Failure is detected when the XT oscillator generates ticks at less than 8 kHz for more than 32 ms. In this case, the date and time can be wrong so an error is returned when an attempt to read the date from the RTC is made. This Oscillator Failure condition is cleared when a new date/time is set into the RTC.
RV-4162
The RV-4162 RTC is similar to ST M41T80 RTC family, so the existing driver has been used as well. However, as this driver was quite old, eight patches have been contributed to update the driver to newer APIs and to add new functionalities such as oscillator failure and alarm. The patches have already been merged by RTC maintainer Alexandre Belloni and should therefore find their way into the 4.7 Linux kernel release:
See [PATCH 0/8] rtc: m41t80: update and add functionalities for the entire patch series. Thanks to this project, the RV-4162 is now supported in the Linux Kernel and the entire family of I2C-based M41T80 RTCs will benefit from these improvements.
RV-3029 / RV-3049
The RV-3029 RTC driver already existed in the Linux kernel, and the the RV-3049 is the same reference than the RV-3029 but it is an SPI-based interface instead of an I2C one. This is a typical case where the regmap mechanism of the Linux kernel is useful: it allows to abstract the register accesses, regardless of the bus being used to communicate with the hardware. Thanks to this, a single driver can easily handle two devices that are interfaced over different busses, but offering the same register set, which is the case with RV-3029 on I2C and RV-3049 on SPI.
For this driver, some updates were needed to prepare the switch to using the regmap mechanism. Once the driver had been converted to regmap and worked as before, the RV-3049 support has been added. Finally, the alarm functionality has been added and fixed. The corresponding patches have already been merged by the RTC maintainer, and should therefore also be part of Linux 4.7:
It is great to see hardware vendors actively engaged in having support for their hardware in the upstream Linux kernel. This way, their users can immediately use the kernel version of their choice on their platform, without having to mess with outdated out-of-tree drivers. Thanks to Microcrystal for supporting this work!
Do not hesitate to contact us if you would like to see your hardware supported in the official Linux kernel. Read more about our Linux kernel upstreaming services.


 Thanks to