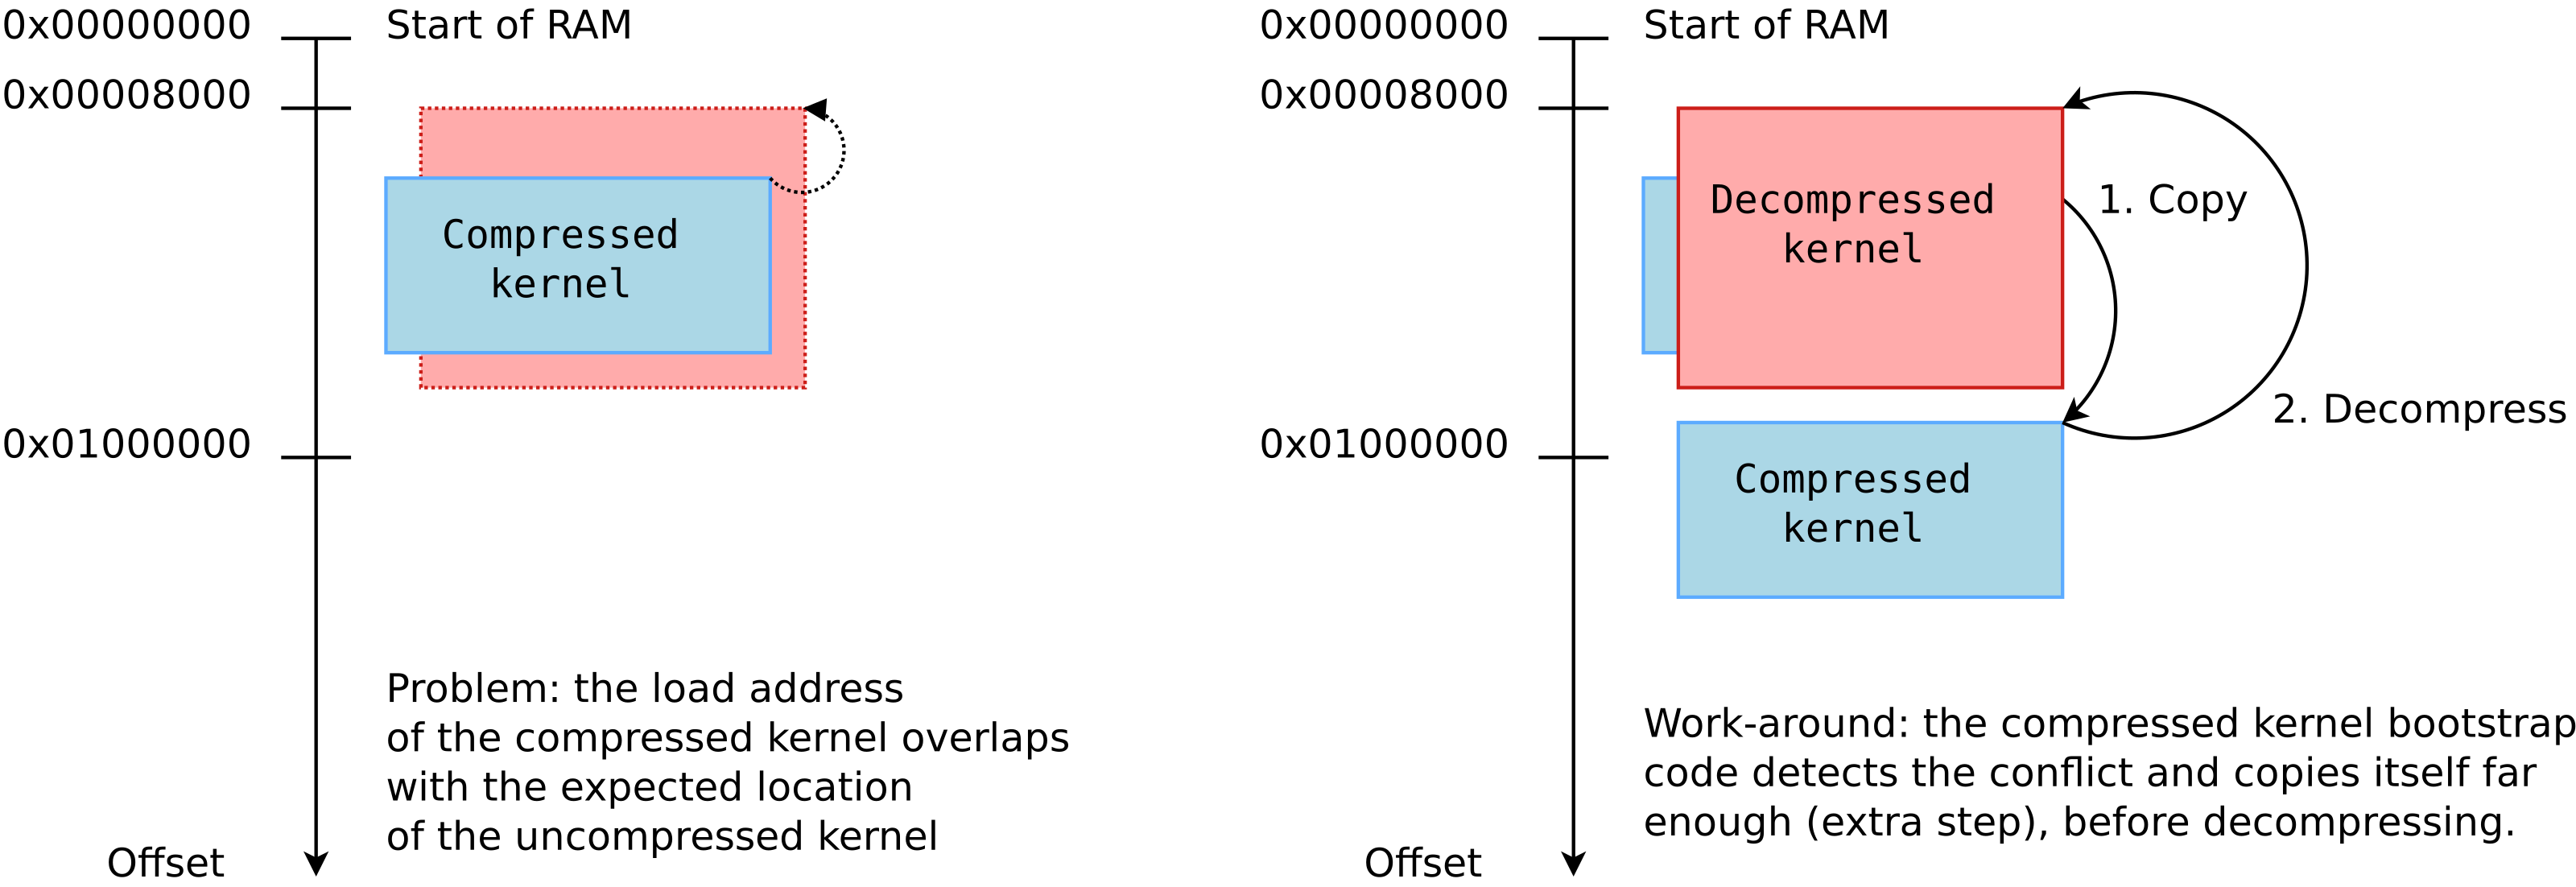
When the compressed and uncompressed kernel images overlap
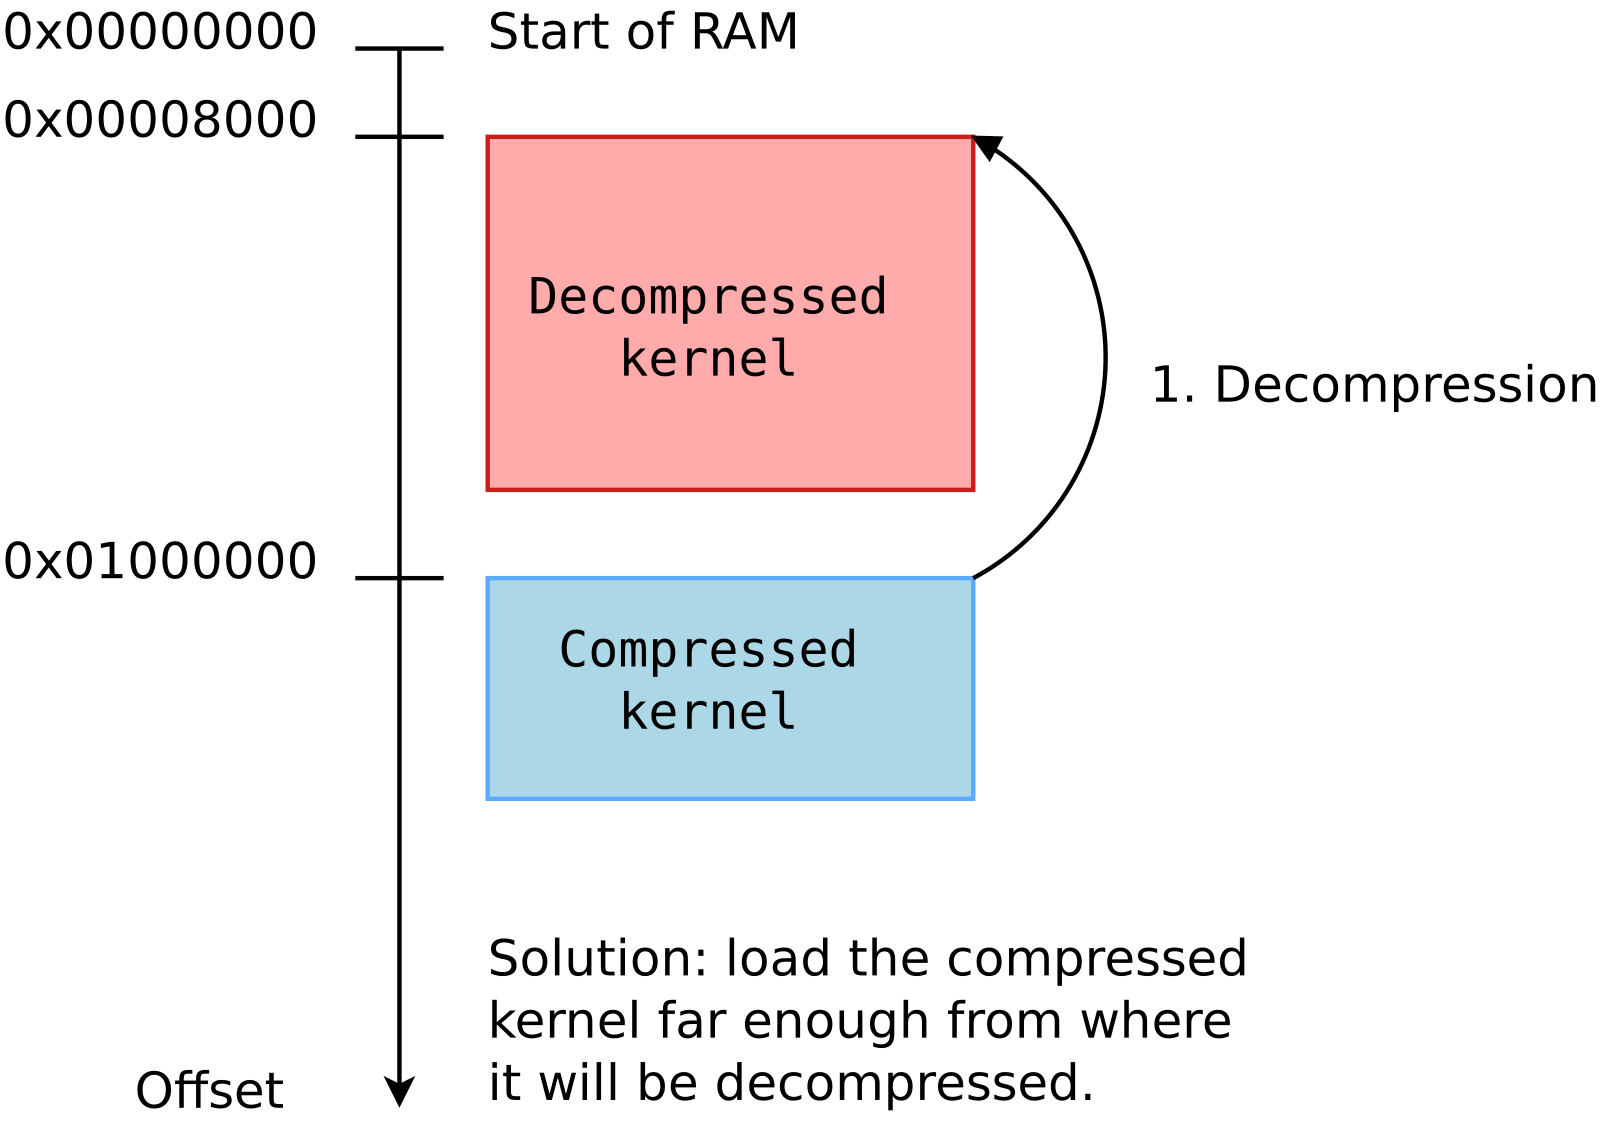
At least on ARM32, there seems to be many working addresses where the compressed kernel can be loaded in RAM. For example, one can load the compressed kernel at offset 0x1000000 (16 MB) from the start of RAM, and the Device Tree Blog (DTB) at offset 0x2000000 (32 MB). Whatever this loading address, the kernel is then decompressed at offset 0x8000 from the start of RAM, as explained this the famous How the ARM32 Linux kernel decompresses article from Linus Walleij.
There is a potential issue with the loading address of the compressed kernel, as explained in the article too. If the compressed kernel is loaded too close to the beginning of RAM, where the kernel must be decompressed, there will be an overlap between the two. The decompressed kernel will overwrite the compressed one, potentially breaking the decompression process.
As you see in the above diagram, when this happens, the bootstrap code in the compressed kernel will first copy the compressed image to a location that’s far enough to guarantee that the decompressed kernel won’t overlap it. However, this extra step in the boot process has a cost.
0xc0000000 is exactly the beginning of RAM! We are therefore in the overlap situation.
We used grabserial from Tim Bird to measure the time between Starting kernel in U-Boot and when the compressed kernel starts executing (Booting Linux on physical CPU 0x0):
...
[4.451996 0.000124] Starting kernel ...
[0.001838 0.001838]
[2.439980 2.438142] [    0.000000] Booting Linux on physical CPU 0x0
...
On a series of 5 identical tests, we obtained an average time of 2,440 ms, with a standard deviation of 0.4 ms.
Then, we measured the optimum case, in which the compressed kernel is loaded far enough from the beginning of RAM so that no overlap is possible:
On a series of 5 identical tests, we obtained an average time of 2,333 ms, with a standard deviation of 0.7 ms.
The new average is 107 ms smaller, which you are likely to consider as a worthy reduction, if you have experience with boot time reduction projects.
What to remember
In your embedded projects, if you are using a compressed kernel, make sure it is loaded far enough from the beginning of RAM, leaving enough space for the decompressed kernel to fit in between. Otherwise, your system will still be able to boot, but depending on the speed of your CPU and storage, it will be slower, from a few tens to a few hundreds of milliseconds.
We checked the How to optimize the boot time page on the STM32 wiki, and it recommends optimum loading addresses: 0xc2000000 for the kernel and 0xc4000000 for the device tree. This way, the upper limit for the decompressed kernel is 32 MB, which is more than enough.
If you are directly using an uncompressed kernel, which is more rare, you should also make sure that it is loaded at an optimum location, so that there is no need to move it before starting it.
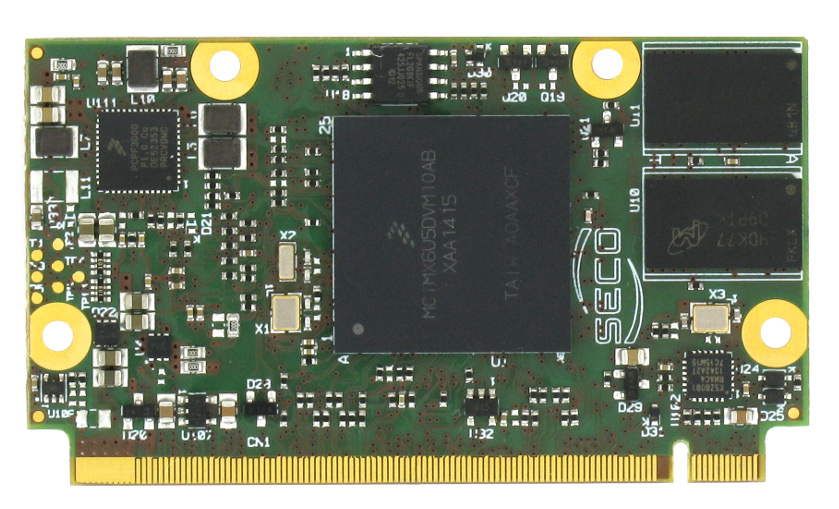
For one of our customers building a product based on i.MX6 with a fairly low-volume, we had to design a mechanism to perform the factory flashing of each product. The goal is to be able to take a freshly produced device from the state of a brick to a state where it has a working embedded Linux system flashed on it. This specific product is using an eMMC as its main storage, and our solution only needs a USB connection with the platform, which makes it a lot simpler than solutions based on network (TFTP, NFS, etc.).
In order to achieve this goal, we have combined the imx-usb-loader tool with the fastboot support in U-Boot and some scripting. Thanks to this combination of a tool, running a single script is sufficient to perform the factory flashing, or even restore an already flashed device back to a known state.
The overall flow of our solution, executed by a shell script, is:
imx-usb-loader pushes over USB a U-Boot bootloader into the i.MX6 RAM, and runs it;
This U-Boot automatically enters fastboot mode;
Using the fastboot protocol and its support in U-Boot, we send and flash each part of the system: partition table, bootloader, bootloader environment and root filesystem (which contains the kernel image).
The SECO uQ7 i.MX6 platform used for our project.
imx-usb-loader
imx-usb-loader is a tool written by Boundary Devices that leverages the Serial Download Procotol (SDP) available in Freescale i.MX5/i.MX6 processors. Implemented in the ROM code of the Freescale SoCs, this protocol allows to send some code over USB or UART to a Freescale processor, even on a platform that has nothing flashed (no bootloader, no operating system). It is therefore a very handy tool to recover i.MX6 platforms, or as an initial step for factory flashing: you can send a U-Boot image over USB and have it run on your platform.
This tool already existed, we only created a package for it in the Buildroot build system, since Buildroot is used for this particular project.
Fastboot
Fastboot is a protocol originally created for Android, which is used primarily to modify the flash filesystem via a USB connection from a host computer. Most Android systems run a bootloader that implements the fastboot protocol, and therefore can be reflashed from a host computer running the corresponding fastboot tool. It sounded like a good candidate for the second step of our factory flashing process, to actually flash the different parts of our system.
Setting up fastboot on the device side
The well known U-Boot bootloader has limited support for this protocol:
The fastboot documentation in U-Boot can be found in the source code, in the doc/README.android-fastboot file. A description of the available fastboot options in U-Boot can be found in this documentation as well as examples. This gives us the device side of the protocol.
In order to make fastboot work in U-Boot, we modified the board configuration file to add the following configuration options:
Other options have to be selected, depending on the platform to fullfil the fastboot dependencies, such as USB Gadget support, GPT partition support, partitions UUID support or the USB download gadget. They aren’t explicitly defined anywhere, but have to be enabled for the build to succeed.
U-Boot enters the fastboot mode on demand: it has to be explicitly started from the U-Boot command line:
U-Boot> fastboot
From now on, U-Boot waits over USB for the host computer to send fastboot commands.
Using fastboot on the host computer side
Fastboot needs a user-space program on the host computer side to talk to the board. This tool can be found in the Android SDK and is often available through packages in many Linux distributions. However, to make things easier and like we did for imx-usb-loader, we sent a patch to add the Android tools such as fastboot and adb to the Buildroot build system. As of this writing, our patch is still waiting to be applied by the Buildroot maintainers.
Thanks to this, we can use the fastboot tool to list the available fastboot devices connected:
# fastboot devices
Flashing eMMC partitions
For its flashing feature, fastboot identifies the different parts of the system by names. U-Boot maps those names to the name of GPT partitions, so your eMMC normally requires to be partitioned using a GPT partition table and not an old MBR partition table. For example, provided your eMMC has a GPT partition called rootfs, you can do:
# fastboot flash rootfs rootfs.ext4
To reflash the contents of the rootfs partition with the rootfs.ext4 image.
However, while using GPT partitioning is fine in most cases, i.MX6 has a constraint that the bootloader needs to be at a specific location on the eMMC that conflicts with the location of the GPT partition table.
To work around this problem, we patched U-Boot to allow the fastboot flash command to use an absolute offset in the eMMC instead of a partition name. Instead of displaying an error if a partition does not exists, fastboot tries to use the name as an absolute offset. This allowed us to use MBR partitions and to flash at defined offset our images, including U-Boot. For example, to flash U-Boot, we use:
The fastboot command must be explicitly called from the U-Boot prompt in order to enter fastboot mode. This is an issue for our use case, because the flashing process can’t be fully automated and required a human interaction. Using imx-usb-loader, we want to send a U-Boot image that automatically enters fastmode mode.
To achieve this, we modified the U-Boot configuration, to start the fastboot command at boot time:
Of course, this configuration is only used for the U-Boot sent using imx-usb-loader. The final U-Boot flashed on the device will not have the same configuration. To distinguish the two images, we named the U-Boot image dedicated to fastboot uboot_DO_NOT_TOUCH.
Putting it all together
We wrote a shell script to automatically launch the modified U-Boot image on the board, and then flash the different images on the eMMC (U-Boot and the root filesystem). We also added an option to flash an MBR partition table as well as flashing a zeroed file to wipe the U-Boot environment. In our project, Buildroot is being used, so our tool makes some assumptions about the location of the tools and image files.
Our script can be found here: flash.sh. To flash the entire system:
# ./flash.sh -a
To flash only certain parts, like the bootloader:
# ./flash.sh -b
By default, our script expects the Buildroot output directory to be in buildroot/output, but this can be overridden using the BUILDROOT environment variable.
Conclusion
By assembling existing tools and mechanisms, we have been able to quickly create a factory flashing process for i.MX6 platforms that is really simple and efficient. It is worth mentioning that we have re-used the same idea for the factory flashing process of the C.H.I.P computer. On the C.H.I.P, instead of using imx-usb-loader, we have used FEL based booting: the C.H.I.P indeed uses an Allwinner ARM processor, providing a different recovery mechanism than the one available on i.MX6.