theora-intro

Add an introduction sequence to a Theora video

Introduction

For the needs of producing conference videos, we developed a Python script to add an introduction sequence to a given Ogg/Theora video:

Usage: theora-intro [options] input-video title-image output-video

Adds an introduction to a source Ogg/Theora video, using the given title image

Options:
  --version             show program's version number and exit
  -h, --help            show this help message and exit
  -v, --verbose         Verbose mode
  --artist=ARTIST       Overrides the ARTIST Ogg metadata
  --title=TITLE         Overrides the TITLE Ogg metadata
  --date=DATE           Overrides the DATE Ogg metadata
  --location=LOCATION   Overrides the LOCATION Ogg metadata
  --organization=ORGANIZATION
                        Overrides the ORGANIZATION Ogg metadata
  --copyright=COPYRIGHT
                        Overrides the COPYRIGHT Ogg metadata
  --license=LICENSE     Overrides the LICENSE Ogg metadata
  --contact=CONTACT     Overrides the CONTACT Ogg metadata

Why was this script created?

This script was created especially for people who need to produce multiple videos, typically from the same event. So far, the only way to add an introduction video with fade-in and fade-out was through interactive video editors, such as kdenlive, and this required to encode the video again. Another reason to create a script is that the sequence of commands to run and the amount of data to extract and generate is rather complex. Having a script rather than just a howto thus reduces the risk of errors and mistakes.

Downloads

All the releases of theora-intro can be found here.

How it works

To create an introduction sequence and concatenate it to the input video, theora-intro first needs to collect information from the input video. In particular, it reads the video width, height, the number of frames per seconds, as well as the audio bitrate and sample frequency, which need to be the same in the introduction sequence.

The introduction sequence shows the input title image (scaled), which fades in from a black picture, and eventually fades out to black again. The script actually generates a series of PNG images (using ImageMagick‘s convert utility), and converts this series into a video using ffmpeg2theora. Any input image format should work (JPG, GIF, PNG…), as ImageMagick supports most existing formats.

To be complete, the introduction sequence also needs an audio track. If it didn’t, the output video wouldn’t have any. Therefore, theora-intro generates a silent sample in WAV format, and converts it to Ogg/Vorbis.

The audio and video for the introduction sequence are then merged and concatenated. For some reasons still a bit unclear, the audio tracks of the introduction and input videos need to be resampled, but at last, there is no need to encode the video again. This makes theora-intro much faster than the time it takes to encode the video (just a few minutes even for big video files encoded in several hours).

You can find out more details by reading the code! It shoudn’t be difficult to understand it.

Ogg Metadata

It is useful to produce Ogg/Theora videos with appropriate metadata (artist, title, location, copyright…). If the input video contains such metadata, these metadata are also replicated to the generated video. Note that theora-intro has options to override these metadata when needed, or when there are no such metadata in the input video.

Requirements

This script relies on several software packages and libraries:

In Ubuntu and Debian, you can get the first four packages as follows:

sudo apt-get install vorbis-tools imagemagick ffmpeg2theora oggz-tools

Anyway, if any of the above packages is missing, theora-intro will let you know.

Use in real life

theora-intro was used to produce videos from the 2009 edition of the Embedded Linux Conference.

Known issues

At the moment, videos generated with the latest release still show a few warnings with the ogginfo command:

$ ogginfo elc2009-bird-closing.ogv 
Processing file "elc2009-bird-closing.ogv"...

New logical stream (#1, serial: 376a8b22): type theora
New logical stream (#2, serial: 06fd37a7): type vorbis
Theora headers parsed for stream 1, information follows...
Version: 3.2.1
Vendor: Xiph.Org libTheora I 20081020 3 2 1
Width: 1280
Height: 720
Total image: 1280 by 720, crop offset (0, 0)
Framerate 25/1 (25.00 fps)
Aspect ratio undefined
Colourspace: Rec. ITU-R BT.470-6 Systems B and G (PAL)
Pixel format 4:2:0
Target bitrate: 0 kbps
Nominal quality setting (0-63): 63
User comments section follows...
	TITLE=Tim Bird (Sony)- ELC Closing
	DATE=May 2009
	LOCATION=San Francisco
	ORGANIZATION=Bootlin
	COPYRIGHT=Bootlin
	LICENSE=Creative Commons BY-SA 3.0
	CONTACT=feedback@...
	ENCODER=ffmpeg2theora-0.23
Vorbis headers parsed for stream 2, information follows...
Version: 0
Vendor: Xiph.Org libVorbis I 20070622 (1.2.0)
Channels: 2
Rate: 48000

Nominal bitrate: 48.000000 kb/s
Upper bitrate not set
Lower bitrate not set
User comments section follows...
	ENCODER=oggVideoTools 0.8
Warning: Expected frame 5265, got 5266
Warning: Expected frame 5270, got 5269
Warning: Expected frame 12663, got 12664
Warning: Expected frame 12667, got 12666
Warning: Expected frame 13657, got 13658
Warning: Expected frame 13660, got 13659
Warning: Expected frame 14213, got 14214
Warning: Expected frame 14218, got 14217
Warning: Expected frame 14875, got 14876
Warning: Expected frame 14879, got 14878
Warning: Expected frame 17635, got 17636
Warning: Expected frame 17638, got 17637
Vorbis stream 2:
	Total data length: 4322809 bytes
	Playback length: 11m:57.264s
	Average bitrate: 48.214426 kb/s
Logical stream 2 ended
Theora stream 1:
	Total data length: 49233283 bytes
	Playback length: 11m:57.320s
	Average bitrate: 549.080277 kb/s
Logical stream 1 ended

These warnings don’t seem to create any issue in Ogg/Theora players. They are probably caused by an issue in the Ogg Video Tools, and we have reported this to their maintainer.

COOol

Checks LibreOffice / OpenOffice.org documents for bad Links

cOOol is a simple Python script that looks for broken hyperlinks in LibreOffice / OpenOffice.org documents.

  • cOOol only supports documents in the OpenDocument format.
  • cOOol is fast: it doesn’t start LibreOffice / OpenOffice.org and runs link checks in parallel threads.
  • cOOol supports most kinds of hyperlinks, including links within the documents.
  • cOOol is easy to use. Just download the script and run it!
  • cOOol is free. It is released under the terms of the GNU General Public License.
cOOol logo

Here is why an automatic link checker for your documents is useful:

  • External references can be a very valuable part of your documents. Broken links reduce their usefulness as well as the impression they make. They also give the feeling that your documents are outdated and older than they are.
  • Web sites evolve frequently. Having an automated way of detecting obsolete links is essential to keeping your documents up to date.
  • You may be much more familiar with your target websites than your readers. They may not be able to find a new location by themselves. You’d better be aware of the change and do this for them!
  • When you rename a page (for example), LibreOffice and OpenOffice.org don’t update all the references to it.

Usage

Usage: coool [options] [OpenOffice.org document files]

Checks OpenOffice.org documents for broken Links

Options:
  --version             show program's version number and exit
  -h, --help            show this help message and exit
  -v, --verbose         display progress information
  -d, --debug           display debug information
  -t MAX_THREADS, --max-threads=MAX_THREADS
                        set the maximum number of parallel threads to create
  -r MAX_REQUESTS_PER_HOST, --max-requests-per-host=MAX_REQUESTS_PER_HOST
                        set the maximum number of parallel requests per host
  -x EXCLUDE_HOSTS, --exclude-hosts=EXCLUDE_HOSTS
                        ignore urls which host name belongs to the given list

When a broken link is found, open the document in OpenOffice.org and use the search facility to look for the link text.

Configuration file

Rather than configuring cOOol from the command line, it is possible to
define the same settings in a ~/.cooolrc file.

Example:

# Configuration file for cOOol

verbose = True
exclude_hosts = "lxr.bootlin.com www.example.com"
max_threads = 200

You can see that configuration file settings have the same name as long
options, except that dash (-) characters are replaced by
underscores (_).

Usage through a proxy

cOOol can be used through a proxy. The Python classes it uses rely on standard Unix environment variables for proxy definition, as in the below bash example:

export http_proxy="proxy.server.com:8080"
export ftp_proxy="proxy.server.com:8080"

Prerequisites

You first need to install the configparse module.

Downloads

cOOol can be found in our odf-tools git tree.

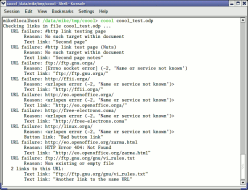
Screenshot

cOOol screenshot

Implementation

cOOol parses the xml components of each document file, looking for hyperlinks.

It would have been cleaner and safer to use the OpenOffice.org API to explore the documents. However, there are also benefits in a standalone Python implementation:

  • No need to start OpenOffice.org and load documents in memory. This saves a lot of time and RAM!
  • No need to have an OpenOffice.org install. Nice if you need to implement a validation server using cOOol.
  • Last but not least, no need to understand OpenOffice.org’s API and the internal structure of documents! By the way, that’s what makes exchange formats like XML attractive. However, we would be delighted if somebody could come up with a simpler and safer implementation based on the API, that could be run within OpenOffice.org user interface!

Testing cOOol

We are using 2 documents to make sure that cOOol finds all the kinds of broken links it is supposed to support:

Limitations and possible improvements

  • cOOol doesn’t check for e-mail links. It could at least check that the corresponding domain is valid.
  • cOOol doesn’t give you page numbers for broken links. You have to open the document and use the search facilities to locate each link.
  • cOOol still crashes on some documents with Unicode strings (for example with Chinese text).
  • cOOol has trouble with link text containing quotes, as in what’s new. The text it outputs is truncated.

clink

Compacts directories by replacing duplicate files by symbolic links

clink is a simple Python script that replaces duplicate files in Unix filesystems by symbolic links.

  • clink saves space. It works particularly well with automatically generated directory structures, such as compiling toolchains.
  • clink uses relative links, making it possible to move processed directory structures
  • clink is fast. It reads each file only once and its runtime is mainly the time taken to read files.
  • clink is light. It consumes very little RAM. No problem to run it on huge filesystems!
  • clink is easy to use. Just download the script and run it!
  • clink is free. It is released under the terms of the GNU General Public License.
clink logo

Usage

usage: clink [options] [files or directories]

Compacts folders by replacing identical files by symbolic links

options:
  --version      show program's version number and exit
  -h, --help     show this help message and exit
  -d, --dry-run  just reports identical files, doesn't make any change.

Screenshot

clink screenshot

Downloads

Here is the OpenPGP key used to generate the signatures.

How it works

clink reads all the files one by one, and computes their SHA (20 bytes) and MD5 (16 bytes) checksums. The trick to easily find identical files is a dictionary of files lists indexed by their SHA checksum.

All the files with the same SHA checksum are not immediately considered as identical. Their MD5 checksums and sizes are also compared then. There is an extremely low probability that files meeting all these 3 criteria at once are different. You are much more likely to face file corruption because of a hardware failure on your computer!

Hard links to the same contents are treated as regular files. Keeping one instance and replacing the others by symbolic links is harmless. Files implemented by symbolic links also have the advantage of not having their contents duplicated in tar archives.

Limitations and possible improvements

  • File permissions: clink just keeps one copy of duplicate files. The permissions of this file may be less strict than those of other duplicates. If permissions matter, enforce them by yourself after running clink.
  • Directory structure: even when entire directories are identical, clink just creates links between files. This is not fully optimal in this case, but it keeps clink simple.

Similar tools or alternatives

  • dupmerge2: replaces identical files by hardlinks.
  • finddup: finds identical files.