Hands-on installation of PipeWire

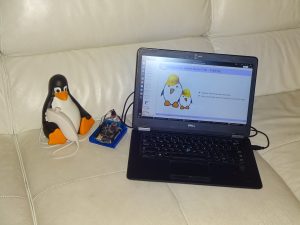
Let’s jump right in! In the previous article, we went through a theoretical overview of PipeWire. Our goal will now be to install and configure a minimal Linux-based system that runs PipeWire in order to output audio to an ALSA sink. The hardware for this demo will be a SAMA5D3 Xplained board and a generic USB sound card (a Logitech USB Headset H340 in our case, as reported by /sys/bus/usb/devices/MAJOR-MINOR/product).

We won’t bother with the bootloader setup (in our case U-Boot) as this is out of scope of our topic; if needed, Bootlin has training sessions for embedded Linux system development for which the training materials are freely available.

We will rely on Buildroot for the root filesystem, and compile our Linux kernel outside Buildroot for ease of development. In the chronological order, here are the steps we’ll follow:

  1. Download Buildroot and configure it. This step will provide us with two things: a cross-compiling toolchain and a root filesystem. We will use a pre-compiled toolchain as compiling a GCC toolchain is a slow process.
  2. Download, configure and build the kernel. This will require small tweaks to ensure the right drivers are compiled-in. We will rely upon the Buildroot-provided toolchain, which will make allow our project to be self-contained and reduce the number of dependencies installed system-wide. This also leads to a more reproducible routine.
  3. Boot our board; this requires a kernel image and a root filesystem. We’ll rely upon U-Boot’s TFTP support to retrieve the kernel image and Linux’s NFS support for root filesystems to allow for quick changes.
  4. Iterate on 1, 2 and 3 as needed! We might want to change kernel options or add packages to our root filesystem.

Feel free to skip the steps that are not required for you if you plan to follow along, this probably assumes some small configuration changes here and there on your side.

Buildroot: toolchain & root filesystem

Let’s start with Buildroot:

$ export WORK_DIR=PATH/TO/WORKING/DIRECTORY/
$ cd $WORK_DIR

# Download and extract Buildroot
$ export BR2_VERSION=2022.02
$ wget "https://buildroot.org/downloads/buildroot-$BR2_VERSION.tar.gz"
$ tar xf buildroot-$BR2_VERSION.tar.gz
$ mv buildroot-$BR2_VERSION buildroot

# Hop into the config menu
$ cd buildroot
$ make menuconfig
# nconfig, xconfig and gconfig are also available options

It’s config time! We’ll use a pre-compiled glibc-based toolchain.

  • In “Target options”:
    • “Target architecture” should be “ARM (little endian)” (BR2_arm symbol);
    • “Target architecture variant” should be “cortex-A5” (BR2_cortex_a5);
    • “Enable VFP extension support” should be true (BR2_ARM_ENABLE_VFP);
  • In “Toolchain”:
    • “Toolchain type” should be “External toolchain” (BR2_TOOLCHAIN_EXTERNAL);
    • “Toolchain” should be “Bootlin toolchains” (BR2_TOOLCHAIN_EXTERNAL_BOOTLIN);
    • “Bootlin toolchain variant” should be “armv7-eabihf glibc stable 2021.11-1” (BR2_TOOLCHAIN_EXTERNAL_BOOTLIN_ARMV7_EABIHF_GLIBC_STABLE);
    • “Copy gdb server to the target” can be set to true, this might come in useful in such experiments (BR2_TOOLCHAIN_EXTERNAL_GDB_SERVER_COPY).
  • In “Build options”, various options could be modified based on preferences: “build packages with debugging symbols”, “build packages with runtime debugging info”, “strip target binaries” and “gcc optimization level”.
  • In “System configuration”, the root password can be defined (BR2_TARGET_GENERIC_ROOT_PASSWD symbol). Changing this from the default empty password will allow us to login using SSH.
  • In “Target packages”, we’ll list them using symbol names as that is easier to search:
    • BR2_PACKAGE_ALSA_UTILS with its APLAY option, to enable testing devices directly using ALSA;
    • BR2_PACKAGE_DROPBEAR to enable the Dropbear SSH server, its client option can be disabled;
    • BR2_PACKAGE_PIPEWIRE, today’s topic.

From this article’s introduction, we know that we still need a session manager to go along with PipeWire. Both pipewire-media-session and WirePlumber are packaged by Buildroot but we’ll stick with WirePlumber as its the recommended option. At the place it should appear in the menuconfig is a message that tells us that we are missing dependencies:

*** wireplumber needs a toolchain w/ wchar, threads and Lua >= 5.3 ***

If in doubt of what causes this message to appear as it lists multiple dependencies, we can find the exact culprit by searching for the BR2_PACKAGE_WIREPLUMBER symbol in menuconfig, which tells us on which symbols WirePlumber depends on:

Symbol: BR2_PACKAGE_WIREPLUMBER [=n]
Type  : bool
Prompt: wireplumber
  Location:
    -> Target packages
      -> Libraries
      (1)     -> Graphics
  Defined at package/wireplumber/Config.in:1
  Depends on: BR2_PACKAGE_PIPEWIRE [=y] &&
    (BR2_PACKAGE_LUA_5_3 [=n] || BR2_PACKAGE_LUA_5_4 [=n]) &&
    BR2_USE_WCHAR [=y] && BR2_TOOLCHAIN_HAS_THREADS [=y] &&
    BR2_USE_MMU [=y]
  Selects: BR2_PACKAGE_LIBGLIB2 [=n]

The depends on entry tells us the boolean expression that needs to be fullfilled for BR2_PACKAGE_WIREPLUMBER to be available. Next to each symbol name is its current value in square brackets.

Note: this process could have been done manually, by looking for the WirePlumber symbol definition in buildroot/package/wireplumber/Config.in and grepping our current .config, seeing what was missing.

The conclusion is that we are missing Lua, which is the scripting used throughout WirePlumber. Enabling BR2_PACKAGE_LUA makes the BR2_PACKAGE_WIREPLUMBER option available, which we enable.

In the Buildroot version we selected, the WirePlumber package lists PACKAGE_DBUS as an unconditional dependency in the WIREPLUMBER_DEPENDENCIES variable, in package/wireplumber/wireplumber.mk. However, WirePlumber can be built fine without it and we therefore need to remove it manually to build successfully our image. This has been fixed for upcoming Buildroot versions.

As often in Buildroot, packages have optional features that get enabled if dependencies are detected. make menuconfig won’t tell us about those, the best way is to browse the package/$PKG/$PKG.mk files for $PKG that interests us and see what gets conditionnally enabled. By visiting PipeWire’s and WirePlumber’s makefiles, we can see that we might want to enable:

  • BR2_PACKAGE_DBUS for various D-Bus-related features which we have explored in the first article; this allows building the SPA D-Bus support plugin relied upon by both PipeWire and WirePlumber, which explains why WirePlumber doesn’t directly depend upon D-Bus;
  • BR2_PACKAGE_HAS_UDEV to support detection of events on ALSA, V4L2 and libcamera devices;
  • BR2_PACKAGE_SYSTEMD for systemd unit files to get generated and systemd-journald support (logging purposes);
  • BR2_PACKAGE_ALSA_LIB for ALSA devices support (which also requires BR2_PACKAGE_ALSA_LIB_{SEQ,UCM} and BR2_PACKAGE_HAS_UDEV);
  • BR2_PACKAGE_AVAHI_LIBAVAHI_CLIENT for network discovery in various PipeWire modules: search for the avahi_dep symbol in PipeWire’s meson.build files for the list;
  • BR2_PACKAGE_NCURSES_WCHAR to build the pw-top monitoring tool;
  • BR2_PACKAGE_LIBSNDFILE to build the pw-cat tool (equivalent of alsa-tools’ aplay);
  • and a few others.

One option that needs discussion is the BR2_PACKAGE_HAS_UDEV. It is required to have the -Dalsa=enabled option at PipeWire’s configure step. As can be seen in PipeWire’s spa/meson.build, this option enforces that ALSA support gets built:

alsa_dep = dependency('alsa', required: get_option('alsa'))

This line seems to indicate that to have ALSA support, we could simply add ALSA as a dependency and rely on the fact that the build system will find it. However, later on in the same Meson build file, we notice:

libudev_dep = dependency(
    'libudev',
    required: alsa_dep.found() or
        get_option('udev').enabled() or
        get_option('v4l2').enabled())

This line means that if the ALSA dependency is found, the libudev dependency is required which would lead to a failing build if we don’t have udev support.

As we expect ALSA support, we’ll make sure BR2_PACKAGE_HAS_UDEV is enabled. To find out what provides this config entry, the easiest way is a search through Buildroot for the select BR2_PACKAGE_HAS_UDEV string, which returns two results:

$ grep -sR "select BR2_PACKAGE_HAS_UDEV" .
./package/eudev/Config.in:      select BR2_PACKAGE_HAS_UDEV
./package/systemd/Config.in:    select BR2_PACKAGE_HAS_UDEV

We’ll stick with eudev and avoid importing the whole of systemd in our root filesystem. To do so, we tell Buildroot to use eudev for /dev management in the “System configuration” submenu (the BR2_ROOTFS_DEVICE_CREATION_DYNAMIC_EUDEV symbol, which automatically selects BR2_PACKAGE_EUDEV).

In turn, PipeWire’s build configuration automatically enables some options if specific dependencies are found. That is why the package/pipewire/pipewire.mk file has sections such as:

ifeq ($(BR2_PACKAGE_NCURSES_WCHAR),y)
PIPEWIRE_DEPENDENCIES += ncurses
endif

Then, in PipeWire’s meson.build, we see ncurses_dep = dependency('ncursesw', required : false) and in src/tools/meson.build:

if ncurses_dep.found()
  executable('pw-top',
    'pw-top.c',
    install: true,
    dependencies : [pipewire_dep, ncurses_dep],
  )
endif

That means pw-top will get built if ncursesw is found; for ncurses the trailing w means wide.

In our specific case, two tools that get conditionally built interest us: pw-top and pw-cat (and its aliases pw-play, pw-record, etc.). The first one will help us monitor the state of active nodes (their busy time, time quantum, etc.) and the second one is capable of playing an audio file by creating a PipeWire source node; it’s the equivalent of aplay, arecord, aplaymidi and arecordmidi. We therefore enable BR2_PACKAGE_NCURSES, BR2_PACKAGE_NCURSES_WCHAR and BR2_PACKAGE_LIBSNDFILE.

One last thing: let’s include an audio test file in our root filesystem image, for easy testing later on. We’ll create a root filesystem overlay directory for this:

$ cd $WORK_DIR
# Create an overlay directory with a .WAV example file
$ mkdir -p overlay/root
# This file is available under a CC BY 3.0 license, see:
# https://en.wikipedia.org/wiki/File:Crescendo_example.ogg
$ wget -O example.ogg \
    "https://upload.wikimedia.org/wikipedia/en/6/68/Crescendo_example.ogg"
# aplay only supports the .voc, .wav, .raw or .au formats
$ ffmpeg -i example.ogg overlay/root/example.wav
$ rm example.ogg

# Set BR2_ROOTFS_OVERLAY to "../overlay"
# This can be done through menuconfig as well
$ sed -i 's/BR2_ROOTFS_OVERLAY=""/BR2_ROOTFS_OVERLAY="..\\/overlay"/' \
    buildroot/.config

We now have a Buildroot configuration that includes BusyBox for primitive needs, Dropbear as an SSH server, PipeWire and its associated session manager WirePlumber, with automatic /dev management and tools that will help us in our tests (aplay and pw-play for outputting audio and pw-top to get an overview on PipeWire’s state). WirePlumber comes with a tool called wpctl that gets unconditionally built. make can be run in Buildroot’s folder so that both the cross-compiling toolchain and the root filesystem get generated and put into Buildroot’s output folder; see the manual for more information about Buildroot’s output/ directory. The toolchain’s GCC and binutils programs in particular can be accessed in output/host/bin/, all prefixed with arm-linux-.

Linux kernel

As we now have an available toolchain, we can go ahead by fetching, configuring and compiling the kernel:

# Download and extract the Linux kernel
$ export LINUX_VERSION=5.17.1
$ wget "https://cdn.kernel.org/pub/linux/kernel/v5.x/linux-$LINUX_VERSION.tar.xz"
$ tar xf linux-$LINUX_VERSION.tar.xz
$ mv linux-$LINUX_VERSION linux

If we compile the kernel as such, it wouldn’t know what our target architecture is and what toolchain to use (it would use what can be found in our $PATH environment variable, which is most probably not right). We therefore need to inform it using three environment variables:

  • Update the $PATH to add access to the recently-acquired toolchain, the one available in Buildroot’s output/host/bin/;
  • Set the $ARCH to the target’s architecture, that is arm in our case;
  • Set $CROSS_COMPILE to the prefix on our binutils tools, arm-linux- in our scenario.

To avoid forgetting those every time we interact with the kernel’s build system, we’ll use a small script that throws us into a shell with the right variables:

#!/bin/sh
# Make sure $WORK_DIR is absolute
export WORK_DIR=$(dirname $(realpath $0))
export PATH="$WORK_DIR/buildroot/output/host/bin:$PATH"
export ARCH=arm
export CROSS_COMPILE=arm-linux-

This script will be called kernel.sh from now on.

We can now configure our kernel, using the SAMA5 defconfig as groundwork:

$ source kernel.sh
$ cd linux

$ make sama5_defconfig
$ make menuconfig
  • In “General setup”:
    • Set “Kernel compression mode” to “LZO” (optional, CONFIG_KERNEL_LZO symbol);
    • Set “Preemption model” to “Preemptible kernel” for a-bit-better latencies (optional, CONFIG_PREEMPT symbol); if low-latency audio is necessary the PREEMPT_RT patch is probably the first step, along with many other configuration tweaks; Bootlin’s PREEMPT_RT training might be of use;
  • Enable the CONFIG_SND_USB_AUDIO option, for support of USB sound cards in ALSA.

It’s time for compilation using make, without forgetting the -jN option to allow N simultaneous jobs.

Booting our board

We can now boot the kernel on our SAMA5D3 Xplained board. On the host side, that requires prepping a TFTP server with both the kernel image and the device tree binary as well as a NFS server (using the Linux kernel NFS server) for the root filesystem:

# Export the kernel image and device tree binary to the TFTP's
# root folder
$ sudo cp \
    linux/arch/arm/boot/{zImage,dts/at91-sama5d3_xplained.dtb} \
    /var/lib/tftpboot

# Create the root filesystem folder
$ mkdir rootfs
# Extract it from Buildroot's output
$ tar xf buildroot/output/images/rootfs.tar -C rootfs
# Allow read/write access to IP 192.168.0.100
$ echo "$WORK_DIR/rootfs 192.168.0.100(rw,no_root_squash,no_subtree_check)" \
    | sudo tee -a /etc/exports
# Tell the NFS server about our changes to /etc/exports
$ sudo exportfs -a

Do not forget to configure your host’s network interface to use a static IP and routing table, with a command such as the following:

nmcli con add type ethernet ifname $DEVICE_NAME ip4 192.168.0.1/24

On the target side, we configure U-Boot’s network stack, boot command and boot arguments.

# Connect to the board using a serial adapter
$ picocom -b 115200 /dev/ttyUSB0

# In U-Boot's command line interface:

=> env default -a
=> env set ipaddr 192.168.0.100
=> env set serverip 192.168.0.1
=> env set ethaddr 00:01:02:03:04:05
=> env set bootcmd "tftp 0x21000000 zImage ;
        tftp 0x22000000 at91-sama5d3_xplained.dtb ;
        bootz 0x21000000 - 0x22000000"
=> # $WORK_DIR has to be substituted manually
=> env set bootargs "console=ttyS0 root=/dev/nfs
        nfsroot=192.168.0.1:$WORK_DIR/rootfs,nfsvers=3,tcp
        ip=192.168.0.100:::::eth0 rw"
=> env save
=> boot

Outputting audio

That leads to a successful kernel boot! Once connected through SSH we can start outputting sound, first using ALSA directly:

# The password comes from BR2_TARGET_GENERIC_ROOT_PASSWD
$ ssh root@192.168.0.100

$ aplay -l
**** List of PLAYBACK Hardware Devices ****
card 0: H340 [Logitech USB Headset H340], device 0: USB Audio [USB Audio]
  Subdevices: 1/1
  Subdevice #0: subdevice #0

$ cd /root
$ aplay example.wav
Playing WAVE 'example.wav' : Signed 16 bit Little Endian, Rate 44100 Hz, Mono

It’s time to start fiddling with PipeWire. The current Buildroot packaging for PipeWire and WirePlumber do not provide scripts for starting using the BusyBox init system’s scripts; it provides service and socket systemd units if that is what is used. We’ll have to start them both manually. Naively running pipewire won’t work but it will make the issue explicit:

$ pipewire
[W][00120.281504] pw.context   | [       context.c:  353 pw_context_new()] 0x447970: can't load dbus library: support/libspa-dbus
[E][00120.313251] pw.module    | [   impl-module.c:  276 pw_context_load_module()] No module "libpipewire-module-rt" was found
[E][00120.318522] mod.protocol-native | [module-protocol-:  565 init_socket_name()] server 0x460aa8: name pipewire-0 is not an absolute path and no runtime dir found. Set one of PIPEWIRE_RUNTIME_DIR, XDG_RUNTIME_DIR or USERPROFILE in the environment
[E][00120.320760] pw.conf      | [          conf.c:  559 load_module()] 0x447970: could not load mandatory module "libpipewire-module-protocol-native": No such file or directory
[E][00120.322600] pw.conf      | [          conf.c:  646 create_object()] can't find factory spa-node-factory

The daemon, during startup, tries to create the UNIX socket that will be used by clients to communicate with it; its default name is pipewire-0. However, without specific environment variables, PipeWire does not know where to put it. The fix is therefore to invocate pipewire with the XDG_RUNTIME_DIR variable set:

$ XDG_RUNTIME_DIR=/run pipewire
[W][03032.468669] pw.context   | [       context.c:  353 pw_context_new()] 0x507978: can't load dbus library: support/libspa-dbus
[E][03032.504804] pw.module    | [   impl-module.c:  276 pw_context_load_module()] No module "libpipewire-module-rt" was found
[E][03032.530877] pw.module    | [   impl-module.c:  276 pw_context_load_module()] No module "libpipewire-module-portal" was found

Some warnings still occur, but they do not block PipeWire in its process:

  • The first line is to be expected, as we compiled PipeWire without D-Bus support.
  • The second one is because the default configuration invokes a PipeWire module that makes the daemon process realtime using setpriority(2) and threads using pthread_setschedparam(3) with SCHED_FIFO. This module, until recently, was not getting compiled if D-Bus support wasn’t available as it had a fallback upon RTKit (D-Bus RPC to ask for augmented process priority, used to avoiding giving the privileges to every process). This is fixed in newer versions as the module is now being compiled without RTKit fallback if D-Bus is not available, but the stable Buildroot version we are using is packaging an older version of PipeWire.
  • The third one refers to portal as in xdg-desktop-portal, a D-Bus based interface to expose various APIs to Flatpak applications. This does not matter to us for an embedded use.

The default PipeWire’s daemon configuration can be overridden to remove those warnings: support.dbus in context.properties controls the loading of the D-Bus library, and modules to be loaded are declared in context.modules. The default configuration is located at /usr/share/pipewire/pipewire.conf and a good way to override is it to touch a file with the same name in /etc/pipewire.

Tip: PipeWire’s logging is controlled using the PIPEWIRE_DEBUG environment variable, as described in the documentation.

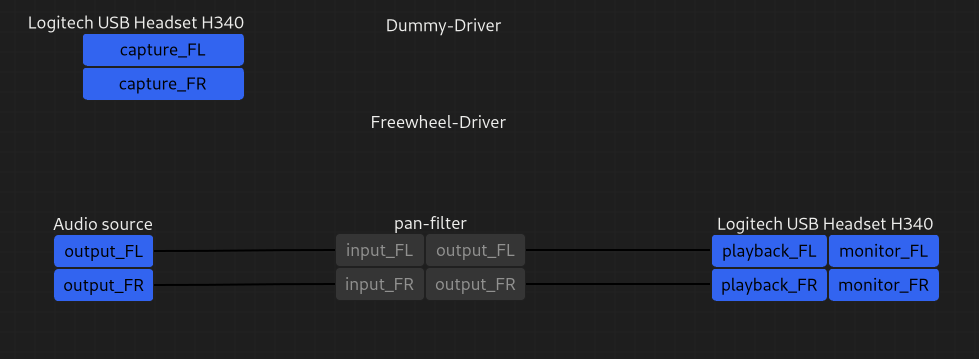
We can therefore use various PipeWire clients and connect to the daemon: XDG_RUNTIME_DIR=/run pw-top should display both the dummy and freewheel drivers doing nothing, and XDG_RUNTIME_DIR=/run pw-dump gives us a JSON of the list of objects in PipeWire’s global registry.

The reason we do not see our ALSA PCM device is that PipeWire is not responsible for monitoring /dev and adding new nodes to the graph; that is our session manager’s responsability. WirePlumber’s configuration needs to be updated from the default to avoid it crashing because of the lack of a few optional dependencies. To update it, the recommended way is the same as for PipeWire: by overloading the configuration file with one located in /etc/wireplumber. Here are the issues with a default config:

  • It expects the SPA bluez library which has as unconditional dependencies libm, dbus, sbc and bluez. It therefore does not get built and cannot be found at runtime by WirePlumber. wireplumber.conf has a { name = bluetooth.lua, type = config/lua } component, which should be commented out to disable Bluetooth support.
  • v4l2 support, through the SPA v4l2 library, has not been built. This can be enabled using the BR2_PACKAGE_PIPEWIRE_V4L2 flag. Disabling the v4l2 monitor requires not calling the v4l2_monitor.enable(), which needs to be commented out in /usr/share/wireplumber/main.lua.d/90-enable-all.lua (Lua’s comments start with two dashes).
  • The ALSA monitor tries to reserve ALSA devices using the org.freedesktop.ReserveDevice1 D-Bus-based protocol.
  • Similarly to PipeWire’s libpipewire-module-portal, WirePlumber has support for Flatpak’s portal, which needs to be disabled as it relies on DBus.

The last two issues can be solved by using the following Lua configuration script, in /etc/wireplumber/main.lua.d/90-disable-dbus.lua:

alsa_monitor.properties["alsa.reserve"] = false
default_access.properties["enable-flatpak-portal"] = false

Once all that is done, WirePlumber’s daemon keeps running and successfully connects to PipeWire:

$ XDG_RUNTIME_DIR=/run wireplumber
M 03:05:17.904989                 pw ../src/pipewire/context.c:353:pw_context_new: 0x4f21d8: can't load dbus library: support/libspa-dbus

The remaining warning can be gotted rid of by setting support.dbus = false in the context.properties section of WirePlumber’s primary configuration.

Tip: those modifications can be added to our filesystem overlay for persistance accross rebuilds of our root filesystem image.

That’s it! WirePlumber now has detected our ALSA sink and source, adding them as nodes to the PipeWire graph. It will detect source nodes that we add to the graph and will link them to the ALSA sink node, outputting audio for our ears to enjoy.

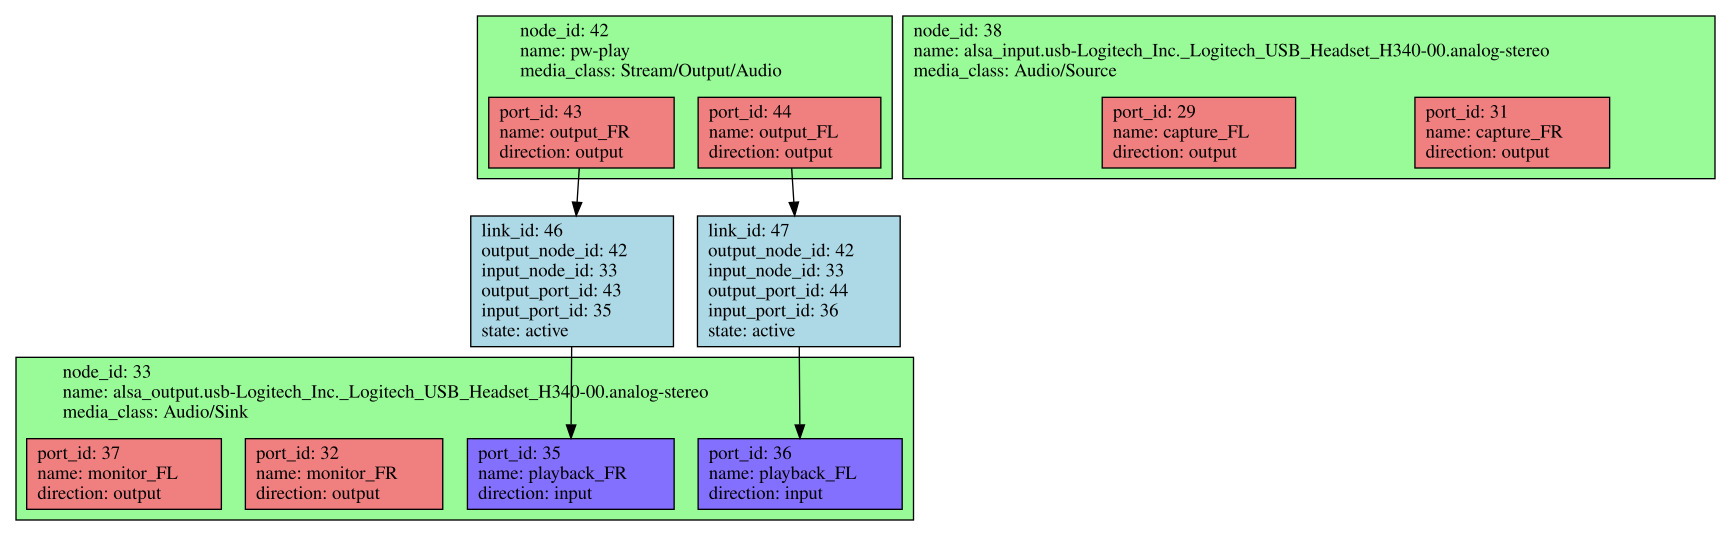
pw-dot, called without any argument, will generate a pw.dot file that represents the active nodes, their ports and the links in the current graph. A .dot file is a textual description of a graph which can be turned graphical using a tool from the Graphviz project. It is simpler to install Graphviz on your host PC, using your favorite package manager, and copy the pw.dot file from the target to the host (a simple local copy as we are using an NFS root filesystem). A SVG file can then be generated as such:

dot -Tsvg pw.dot > pw.svg

Here is what the graph looks like when audio is being outputted using a single source:

PipeWire graph generated by pw-dot, click to see in full size

Conclusion

We have managed to create a rather bare image, with WirePlumber monitoring ALSA devices and adding them as devices and nodes to the PipeWire graph. WirePlumber automatically creates links between source nodes and the default sink node, which means that audio is outputted.

The next step is to create our own custom PipeWire source node. We’ll be able to use the PipeWire API through libpipewire and see what information and capabilities it exposes relative to the overall graph.

An introduction to PipeWire

This blog post is the first part of a series of 3 articles related to the PipeWire project and its usage in embedded Linux systems.

Introduction

PipeWire is a graph-based processing engine, that focuses on handling multimedia data (audio, video and MIDI mainly).

It has gained steam early on by allowing screen sharing on Wayland desktops, which for security reasons, does not allow an application to access any framebuffer that does not concern it. The PipeWire daemon was run with sufficient privileges to access screen data; giving access through a D-Bus service to requesting applications, with file-descriptor passing for the actual video transfer. It was as such bundled in the Fedora distribution, version 27.

Later on, the idea was to expand this to also allow handling audio streams in the processing graph. Big progress has been done by Wim Taymans on this front, and PipeWire is now the default sound server of the desktop Fedora distribution, since version 34.

The project is currently in active development. It happens in the open, lead by Wim Taymans. The API and ABI can both be considered stable, even though version 1.0 has not been released yet. The changelog exposes very few breaking changes (two years without one) and many bug fixes. It is developed in C, using a Meson and Ninja based build system. It has very few unconditional runtime dependencies, but we’ll go through those during our first install.

Throughout this series of blog articles, our goal will be to discover PipeWire and the possiblities it provides, focusing upon audio usage on embedded platforms. A detailed theoretical overview at the start will allow us to follow up with a hands-on approach. Starting with a minimal Buildroot setup on a Microchip SAMA5D3 Xplained board, we will create then our own custom PipeWire source node. We will then study how dynamic, low-latency routing can be done. We’ll end with experiments regarding audio-over-ethernet.

A note: we will start with many theoretical aspects, that are useful to get a good mental model of the way PipeWire works and how it can be used to implement any wanted behavior. This introduction might therefore get a little exhaustive at times, and it could be a good approach to skip even if a concept isn’t fully grasped, to come back later during hands-ons when details on a specific subject is required.

Sky-high overview

A PipeWire graph is composed of nodes. Each node takes an arbitrary number of inputs called ports, does some processing over this multimedia data, and sends data out of its output ports. The edges in the graph are here called links. They are capable of connecting an output port to an input port.

Nodes can have an arbitrary number of ports. A node with only output ports is often called a source, and a sink is a node that only possesses input ports. For example, a stereo ALSA PCM playback device can be seen as a sink with two input ports: front-left and front-right.

Here is a visual representation of a PipeWire graph instance, provided by the Helvum GTK patchbay:

Screenshot provided by the Helvum project

Visual attributes are used in Helvum to describe the state of nodes, ports and links:

  • Node names are in white, with their ports being underneath the names. Input ports are on the left while output ports are on the right.
  • “Dummy-Driver” and “Freewheel-Driver” nodes have no ports. Those two are particular sinks (with dynamic input ports, that appear when we connect a node to them) used in specific conditions by PipeWire.
  • Red means MIDI, yellow means video and blue means audio.
  • Links are solid when active (data is “passing-through” them) and dashed when in a paused state.

Note: if your Linux desktop is running PipeWire, trying installing Helvum to graphically monitor and edit your multimedia graph! It is currently packaged on Fedora, Arch Linux, Flathub, crates.io and others.

Design choices

There are a few noticeable design choices that explain why PipeWire is being adopted for desktop and embedded Linux use cases.

Session and policy management

One first design choice was to avoid tackling any management logic directly inside PipeWire; context-dependent behaviour such as monitoring for new ALSA devices, and configuring them so that they appear as nodes, or automatically connecting nodes using links is not handled. It rather provides an API that allows spawning and controlling those graph objects. This API is then relied upon by client processes to control the graph structure, without having to worry about the graph execution process.

A pattern that is often used and is recommended is to have a single client be a daemon that deals with the whole session and policy management. Two implementations are known as of today:

  • pipewire-media-session, which was the first implementation of a session manager. It is now called an example and used mainly in debugging scenarios.
  • WirePlumber, which takes a modular approach: it provides another, higher-level API compared to the PipeWire one, and runs Lua scripts that implement the management logic using the said API. In particular, this session manager gets used in Fedora since version 35. It ships with default scripts and configuration that handle linking policies as well as monitoring and automatic spawning of ALSA, bluez, libcamera and v4l2 devices. The API is available from any process, not only from WirePlumber’s Lua scripts.

Individual node execution

As described above, the PipeWire daemon is responsible for handling the proper processing of the graph (executing nodes in the right order at the right time and forwarding data as described by links) and exposing an API to allow authorized clients to control the graph. Another key point of PipeWire’s design is that the node processing can be done in any Linux process. This has a few implications:

  • The PipeWire daemon is capable of doing some node processing. This can be useful to expose a statically-configured ALSA device to the graph for example.
  • Any authorized process can create a PipeWire node and be responsible for the processing involved (getting some data from input ports and generating data for output ports). A process that wants to play stereo audio from a file could create a node with two output ports.
  • A process can create multiple PipeWire nodes. That allows one to create more complex applications; a browser would for example be able to create a node per tab that requests the ability to play audio, letting the session manager handle the routing: this allows the user to route different tab sources to different sinks. Another example would be an application that requires many inputs.

API and backward compatibility

As we will see later on, PipeWire introduces a new API that allows one to read and write to the graph’s overall state. In particular, it allows one to implement a source and/or sink node that will be handling audio samples (or other multimedia data).

One key point for PipeWire’s quick adoption is a focus on providing a shim layer to currently-widespread audio API in the Linux environment. That is:

    • It can obviously expose ALSA sinks or sources inside the graph. This is at the heart of what makes PipeWire useful: it can interact with local audio hardware. It uses alsa-lib as any other ALSA client. PipeWire is also capable of creating virtual ALSA sinks or sources, to interface with applications that rely solely upon the alsa-lib API.
    • It can implement the PulseAudio API in place of PulseAudio itself. This simply requires starting a second PipeWire daemon, with a specific pulse configuration. Each PulseAudio sink/source will appear in the graph, as if native. PulseAudio is the main API used by Linux desktop users and this feature allows PipeWire to be used as a daily-driver while supporting all standard applications. An anecdote: relying on the PulseAudio API is still recommended for simple audio applications, for its more widespread and simpler API.
    • It also implements the JACK Audio Connection Kit (or JACK); this API has been in use by the pro-audio audience and targets low-latency for audio and MIDI connections between applications. This requires calling JACK-based applications using pw-jack COMMAND, which does the following according to its manual page:

pw-jack modifies the LD_LIBRARY_PATH environment variable so that applications will load PipeWire’s reimplementation of the JACK client libraries instead of JACK’s own libraries. This results in JACK clients being redirected to PipeWire.

Schema illustrating the way PulseAudio and JACK applications are supported

About compatibility with Linux audio standards, the PipeWire FAQ has an interesting answer to the expected question whenever something new appears: why another audio standard, Linux already has 13 of them? For exhaustiveness, here is a quick rundown of the answer: it describes how Linux has one kernel audio subsystem (ALSA) and only two userspace audio servers: PulseAudio and JACK. Others are either frameworks relying on various audio backends, dead projects or wrappers around audio backends. PipeWire’s goal, on the audio side, is to provide an alternative to both PulseAudio and JACK.

Real-time execution: push or pull?

In the simple case of a producer and a consumer of data, two execution models are in theory possible:

  • Push, where the producer generates data when it can into a shared buffer, from which the consumer reads. This is often associated with blocking writes to signal the producer when the buffer is full.
  • Pull, where the producer gets signaled when data is needed for the consumer, at which point the producer should generate data as fast as possible into the given shared buffer.

In a real-time case scenario, latency is optimal when the data quantity in the shared buffer is minimised: when the producer adds data to the buffer, all the data already present in the buffer needs to be consumed before the new data gets processed as well. As such, the pull method allows the system to monitor the shared buffer state and signal the producer before the shared buffer gets empty; this guarantees data that is as up-to-date as possible as it was generated as late as possible.

That was for a generic overview of pushed versus pulled communication models. PipeWire adopts the pull model as it has low latencies as a goal. Some notes:

  • The structure is more complex compared to a single producer and single consumer architecture, as there can be many more producers and consumers, possibly with nodes depending on multiple other nodes.
  • The PipeWire daemon handles the signaling of nodes. Those get woken up, fill a shared memory buffer and pass it onto its target nodes; those are the nodes that take its output as an input (as described by link objects).
  • The concept of driver nodes is introduced; other nodes are called followers. For each component (subgraph of the whole PipeWire graph), one node is the driver and is responsible for timing information. It is the one that signals PipeWire when a new execution cycle is required. For the simple case of an audio source node (the producer) and an ALSA sink node (the consumer), the ALSA sink will send data to the hardware according to a timer, signaling PipeWire to start a new cycle when it has no more data to send: it pulls data from the graph by telling it that it needs more.

Note: in this simple example, the buffer size provided to ALSA by PipeWire determines the time we have to generate new data. If we fail to execute the entire graph in time before the timer, the ALSA sink node will have no data and this will lead to an underrun.

Implementation overview

This introduction and the big design decisions naturally lead us to have a look at the actual implementation concepts. Here are the questions we will try to answer:

  • How is the graph state represented?
  • How can a client process get access to the graph state and make changes?
  • How is IPC communication handled?

Graph state representation: objects, objects everywhere

As said previously, PipeWire’s goal is to maintain, execute and expose a graph-structured multimedia execution engine. The graph state is maintained by the PipeWire daemon, which runs the core object. A fundamental principle is the concept of an object. Clients communicate with the core using IPC, and can create objects of various types, which can then be exported. Exporting an object means telling the core and its registry about it, so that the object becomes a part of the graph state.

Every object have at least the following: a unique integer identifier, some permissions flags for various operations, an object type, string key-value pairs of properties, methods and event types.

Object types

There is a fixed type list, so let’s go through the main existing types to understand the overall structure better:

  • The core is the heart of the PipeWire daemon. There can only be one core per graph instance and it has the identifier zero. It maintains the registry, which has the list of exported objects.
  • A client object is the representation of an open connection with a client process, from within the daemon process.
  • A module is a shared object that is used to add functionality to a PipeWire client. It has an initialisation function that gets called when the module gets loaded. Modules can be loaded in the core process or in any client process. Clients do not export to the registry the modules they load. We’ll see examples of modules and how to load them later on.
  • A node is a producer and/or consumer of data; its main characteristic is to have input and output port objects, which can be connected using link objects to create the graph structure.
  • A port belongs to a node and represents an input or output of data. As such, it has a direction, a data format and can have a channel position if it is audio data that is being transferred.
  • A link object connects two ports of opposite direction together; it describes a graph edge.
  • A device is a handle representing an underlying API, which is then used to create nodes or other devices. Examples of devices are ALSA PCM cards or V4L2 devices. A device has a profile, which allows one to configure them.
  • A factory is an object whose sole capability is to create other objects. Once a factory is created, it can only emit the type of object it declared. Those are most often delivered as a module: the module creates the factory and stays alive to keep it accessible for clients.
  • A session object is supposed to represent the session manager, and allow it to expose APIs through the PipeWire communication methods. It is not currently used by WirePlumber but this is planned.
  • An endpoint is the concept of a (possibly empty) grouping of nodes. Associated with endpoint streams and links, they can represent a higher-level graph that is handled by the session manager. Those would allow modeling complex behaviors such as mutually-exclusive sinks (think laptop speakers and line-out port) or nodes to which PipeWire cannot send audio streams, such as analog peripherals for which the streams do not go through the CPU. Those peripherals would therefore appear in the graph, be controlled with the same API (routing using links, setting volume, muting, etc.) but the processing would be done outside PipeWire’s reach. See PipeWire’s documentation for more information on the potential of those advanced features.

Permissions

The session and policy manager (most often WirePlumber) is also responsible for defining the list of permissions each client has. Each permission entry is an object ID and four flags. A special PW_ID_ANY ID means that those permissions are the default, to be used if a specific object is not described by any other permission. Here are the four flags:

  • Read: the object can be seen and events can be received;
  • Write: the object can be modified, usually through methods (which requires the execute flag);
  • eXecute: methods can be called;
  • Metadata: metadata can be set on the object.

This isn’t well leveraged upon yet, as all clients get default permissions of rwxm: read, write, execute, metadata.

Properties

All objects also have properties attributed to them, which is a list of string key-value pairs. Those are abitrary and various keys are expected for various object types. An example link object has the following properties (as reported by pw-cli info LINK_ID):

# Link ID
object.id = "95"

# Source port
link.output.node = "91"
link.output.port = "93"

# Destination port
link.input.node = "80"
link.input.port = "86"

# Client that created the link
client.id = "32"

# Factory that was called to create the link
factory.id = "20"

# Serial identifier: an incremental identifier that guarantees no
# duplicate across a single instance. That exists because standard
# IDs get reused to keep them user-friendly.
object.serial = "677"

Parameters

Some object types also have parameters (often abbreviated as params), which is a fixed-length list of parameters that the object possesses, specific to the object type. Currently, nodes, ports, devices, sessions, endpoints and endpoint streams have those. Those params have flags that define if they can be read and/or written, allowing things like constant parameters defined at the object creation.

Parameters are the key that allow WirePlumber to negotiate data formats and port configuration with nodes: hardware that supports multiple sample rates? channel count and positions? sample format? enable monitor ports? etc. Nodes expose enumerations of what they are capable of, and the session manager writes the format/configuration it chose.

Methods & events

An object’s implementation is defined by its list of methods. Each object type has a list of methods that it needs to implement. One note-worthy method is process, that can be found on nodes. It is the one that eats up data from input ports and provides data for each output port.

Every object implement at least the add_listener method, that allows any client to register event listeners. Events are used through the PipeWire API to expose information about an object that might change over time (the state of a node for example).

Exposing the graph to clients: libpipewire and its configuration

Once an object is created in a process, it can be exported to the core’s registry so that it becomes a part of the graph. Once exported, an object is exposed and can be accessed by other clients; this leads us into this new section: how clients can get access and interact with the graph.

The easiest way to interact with a PipeWire instance is to rely upon the libpipewire shared object library. It is a C library that allows one to connect to the core. The connection steps are as follows:

  1. Initialise the library using pw_init, whose main goal is to setup logging.
  2. Create an event-loop instance, of which PipeWire provides multiple implementations. The library will later plug into this event-loop to register event listeners when requested.
  3. Create a PipeWire context instance using pw_context_new. The context will handle the communication process with PipeWire, adding what it needs to the event-loop. It will also find and parse a configuration file from the filesystem.
  4. Connect the context to the core daemon using pw_context_connect. This does two things: it initialises the communication method and it returns a proxy to the core object.

Proxies

A proxy is an important concept. It gives the client a handle to interact with a PipeWire object which is located elsewhere but which has been registered in the core’s registry. This allows one to get information about this specific object, modify it and register event listeners.

Event listeners are therefore callbacks that clients can register on proxy objects using pw_*_add_listener, which takes a struct pw_*_events defining a list of function pointers; the star should be replaced by the object type. The libpipewire library will tell the remote object about this new listener, so that it notifies the client when a new event occurs.

We’ll take an example to describe the concept of proxies:

Schema of a daemon and two clients, with one client having a proxy pointing to the remote node

In this schema, green blocks are objects (the core, clients and a node) and grey ones are proxies. Dotted blocks represent processes. Here is what would happen, in order, assuming client process 2 wants to get the the state of a node that lives in client process 1:

  1. Client process 2 creates a connection with the core, that means:
    • On the daemon side, a client object is created and exported to the registry;
    • On the client side, a proxy to the core object is acquired, which represents the connection with the core.
  2. It then uses the proxy to core and the pw_core_get_registry function to get a handle on the registry.
  3. It registers an event listener on the registry’s global event, by passing a struct pw_registry_events to pw_registry_add_listener. That event listener will get called once for each object exported to the registry.
  4. The global event handler will therefore get called once with the node as argument. When this happens, a proxy to the node can be obtained using pw_registry_bind and the info event can be listened upon using pw_node_add_listener on the node proxy with a struct pw_client_events containing the list of function pointers used as event handlers.
  5. The info event handler will therefore be called once with a struct pw_node_info argument, that contains the node’s state. It will then be called each time the state changes.

The same thing is done in tutorial6.c to print every clients’ information.

Context configuration

When a PipeWire context is created using pw_context_new, we mentioned that it finds and parses a configuration file from the filesystem. To find a configuration file, PipeWire requires its name. It then searches for this file in following locations, $sysconfdir and $datadir being PipeWire build variables:

  1. Firstly, it checks in $XDG_CONFIG_HOME/pipewire/ (most probably ~/.config/pipewire/);
  2. Then, it looks in $sysconfdir/pipewire/ (most probably /etc/pipewire/);
  3. As a last resort, it tries $datadir/pipewire/ (most probably /usr/share/pipewire/).

PipeWire ships with default configuration files, which are often put in the $datadir/pipewire/ path by distributions, meaning those get used as long as they have not been overriden by custom global configuration files (in $sysconfdir/pipewire/) or personal configuration files (in $XDG_CONFIG_HOME/pipewire/). Those are namely:

  • pipewire.conf, the daemon’s configuration file;
  • pipewire-pulse.conf, for the daemon process that implements the PulseAudio API;
  • client.conf, for processes that want to communicate using the PipeWire API;
  • client-rt.conf, for processes that want to implement node processing, RT meaning realtime;
  • jack.conf, used by the PipeWire implementation of the JACK shared object library;
  • minimal.conf, meant as an example for those that want to run PipeWire without a session manager (static configuration of an ALSA device, nodes and links).

The default configuration name used by a context is client.conf. This can be overriden either through the PIPEWIRE_CONFIG_NAME environment variable or through the PW_KEY_CONFIG_NAME property, given as an argument to pw_context_new. The search path can also be modified using the PIPEWIRE_CONFIG_PREFIX environment variable.

Make sure to go through one of them to get familiar with them! The format is described as a “relaxed JSON variant”, where strings do not need to be quoted, the key-value separator is an equal symbol, commas are unnecessary and comments are allowed starting with an hash mark. Here are the sections that can be found in a configuration file:

  • context.properties, that configures the context (log level, memory locking, D-Bus support, etc.). It is also used extensively by pipewire.conf (the daemon’s configuration) to configure the graph default and allowed settings.
  • context.spa-libs defines the shared object library that should be used when a SPA factory is asked for. The default values are best to be kept alone.
  • context.modules lists the PipeWire modules that should be loaded. Each entry has an associated comment that explains clearly what each modules does. As an example, the difference between client.conf and client-rt.conf is the loading of libpipewire-module-rt that turns on real-time priorities for the process and its threads.
  • context.objects allows one to statically create objects by providing a factory name associated with arguments. This is what is used by the daemon’s pipewire.conf to create the dummy node, or by minimal.conf to statically create an ALSA device and node as well as a static node.
  • context.exec lists programs that will be executed as childs of the process (using fork(2) followed by execvp(3)). This was primarily used to start the session manager; it is however recommended to handle its boot separately, using your init system of choice.
  • filter.properties and stream.properties are used in client.conf and client-rt.conf to configure node implementations. Filters and streams are the two abstractions that can be used to implement custom nodes, which we will talk in detail in a later article.

Inter-Process Communication (IPC)

Being a project that handles multimedia data, transfers it in-between processes and aims for low-latency, the inter-process communication it uses is at the heart of its implementation.

Event loop

The event-loop described previously is the scheduling mechanism for every PipeWire process (the daemon and every PipeWire client process, including WirePlumber, pipewire-pulse and others). This loop is an abstraction layer over the epoll(7) facility. The concept is rather simple: it allows one to monitor multiple file descriptors with a single blocking call, that will return once one file descriptor is available for an operation.

The main entry point to this event loop is pw_loop_add_source or its wrapper pw_loop_add_io, which adds a new file descriptor to be listened for and a callback to take action once an operation is possible. In addition to the loop instance, the file descriptor and the callback, it takes the following arguments:

  • A mask describing the operations for which we should be waken up: read(2) is possible (SPA_IO_IN), write(2) is possible (SPA_IO_OUT), an error occured (SPA_IO_ERR) and a hang-up occured (SPA_IO_HUP);
  • A boolean describing whether the file descriptor should be closed automatically at the end of not;
  • A void pointer given to the callback; this is often called user data which means we can avoid static global variables.

Note: this event loop implementation is not reserved to PipeWire-related processing; it can be used as a main event loop in your processes.

That leads us to the other synchronisation and communication primitives used, which are all file-descriptor-based for integration with the event loop.

File-descriptor-based IPC

eventfd(2) is used as the main wake-up method when that is required, such as with node objects that must run their process method. signalfd(2) is used to register signal callbacks in the event-loop.

epoll(7), eventfd(2) and signalfd(2) being Linux-specific, it should be noted that there is an abstraction layer that allows one to use other primitives for implementations. Currently, Xenomai primitives are supported through this layer.

The main communication protocol is based upon a local streaming socket(2): socket(PF_LOCAL, SOCK_STREAM | SOCK_CLOEXEC | SOCK_NONBLOCK, 0). The encoding scheme used is called Plain Object Data (POD) and is a rather simple format; a POD has a 32-bits size, a 32-bits type followed by the content. There are basic types (none, bool, int, string, bytes, etc.) and container types (array, struct, object and sequence). In top of this encoding scheme is provided the Simple Plugin API (SPA) which implements a sort of Remote Procedure Call (RPC). See this PipeWire under the hood blog article that has a detailed section on POD, SPA and example usage of the provided APIs.

D-Bus

PipeWire and WirePlumber also optionally depend on the higher-level D-Bus communication protocol for specific features:

  • Flatpaks are desktop sandboxed applications, that rely on portal (a process that exposes D-Bus interfaces) to access system-wide features such as printing and audio. In our case, libpipewire-module-portal allows the portal process to handle permission management relative to audio for Flatpak applications. See module-portal.c and xdg-desktop-portal for more information.
  • WirePlumber, through its module-reserve-device, supports the org.freedesktop.ReserveDevice1 D-Bus interface. It allows one to reserve an audio device for exclusive use. See the quick and to-the-point specification about the interface for more information.
  • D-Bus support is required if Bluetooth is wanted, to allow communication with the BlueZ process. See the SPA bluez5 plugin.

Conclusion

Now that the overall concepts as well as design and implementation choices have been covered, it is time for some hands-on! We will carry on with a bare install based upon a Linux kernel and a Buildroot-built root filesystem image. Our goal will be to output sound to an USB ALSA PCM sink, from an audio file.

Do not hesitate to come back to this article later on, that might help you clear-up some blurry concepts if needed!

Covid-19: Bootlin proposes online sessions for all its courses

Tux working on embedded Linux on a couchLike most of us, due to the Covid-19 epidemic, you may be forced to work from home. To take advantage from this time confined at home, we are now proposing all our training courses as online seminars. You can then benefit from the contents and quality of Bootlin training sessions, without leaving the comfort and safety of your home. During our online seminars, our instructors will alternate between presentations and practical demonstrations, executing the instructions of our practical labs.

At any time, participants will be able to ask questions.

We can propose such remote training both through public online sessions, open to individual registration, as well as dedicated online sessions, for participants from the same company.

Public online sessions

We’re trying to propose time slots that should be manageable from Europe, Middle East, Africa and at least for the East Coast of North America. All such sessions will be taught in English. As usual with all our sessions, all our training materials (lectures and lab instructions) are freely available from the pages describing our courses.

Our Embedded Linux and Linux kernel courses are delivered over 7 half days of 4 hours each, while our Yocto Project, Buildroot and Linux Graphics courses are delivered over 4 half days. For our embedded Linux and Yocto Project courses, we propose an additional date in case some extra time is needed to complete the agenda.

Here are all the available sessions. If the situation lasts longer, we will create new sessions as needed:

Type Dates Time Duration Expected trainer Cost and registration
Embedded Linux (agenda) Sep. 28, 29, 30, Oct. 1, 2, 5, 6 2020. 17:00 – 21:00 (Paris), 8:00 – 12:00 (San Francisco) 28 h Michael Opdenacker 829 EUR + VAT* (register)
Embedded Linux (agenda) Nov. 2, 3, 4, 5, 6, 9, 10, 12, 2020. 14:00 – 18:00 (Paris), 8:00 – 12:00 (New York) 28 h Michael Opdenacker 829 EUR + VAT* (register)
Linux kernel (agenda) Nov. 16, 17, 18, 19, 23, 24, 25, 26 14:00 – 18:00 (Paris time) 28 h Alexandre Belloni 829 EUR + VAT* (register)
Yocto Project (agenda) Nov. 30, Dec. 1, 2, 3, 4, 2020 14:00 – 18:00 (Paris time) 16 h Maxime Chevallier 519 EUR + VAT* (register)
Buildroot (agenda) Dec. 7, 8, 9, 10, and 11, 2020 14:00 – 18:00 (Paris time) 16 h Thomas Petazzoni 519 EUR + VAT* (register)
Linux Graphics (agenda) Dec. 1, 2, 3, 4, 2020 14:00 – 18:00 (Paris time) 16 h Paul Kocialkowski 519 EUR + VAT* (register

* VAT: applies to businesses in France and to individuals from all countries. Businesses in the European Union won’t be charged VAT only if they provide valid company information and VAT number to Evenbrite at registration time. For businesses in other countries, we should be able to grant them a VAT refund, provided they send us a proof of company incorporation before the end of the session.

Each public session will be confirmed once there are at least 6 participants. If the minimum number of participants is not reached, Bootlin will propose new dates or a full refund (including Eventbrite fees) if no new date works for the participant.

We guarantee that the maximum number of participants will be 12.

Dedicated online sessions

If you have enough people to train, such dedicated sessions can be a worthy alternative to public ones:

  • Flexible dates and daily durations, corresponding to the availability of your teams.
  • Confidentiality: freedom to ask questions that are related to your company’s projects and plans.
  • If time left, possibility to have knowledge sharing time with the instructor, that could go beyond the scope of the training course.
  • Language: possibility to have a session in French instead of in English.

Online seminar details

Each session will be given through Jitsi Meet, a Free Software solution that we are trying to promote. As a backup solution, we will also be able to Google Hangouts Meet. Each participant should have her or his own connection and computer (with webcam and microphone) and if possible headsets, to avoid echo issues between audio input and output. This is probably the best solution to allow each participant to ask questions and write comments in the chat window. We also support people connecting from the same conference room with suitable equipment.

Each participant is asked to connect 15 minutes before the session starts, to make sure her or his setup works (instructions will be sent before the event).

How to register

For online public sessions, use the EventBrite links in the above list of sessions to register one or several individuals.

To register an entire group (for dedicated sessions), please contact training@bootlin.com and tell us the type of session you are interested in. We will then send you a registration form to collect all the details we need to send you a quote.

You can also ask all your questions by calling +33 484 258 097.

Questions and answers

Q : Should I order hardware in advance, our hardware included in the training cost?
R : No, practical labs are replaced by technical demonstrations, so you will be able to follow the course without any hardware. However, you can still order the hardware by checking the “Shopping list” pages of presentation materials for each session. This way, between each session, you will be able to replay by yourself the labs demonstrated by your trainer, ask all your questions, and get help between sessions through our dedicated Matrix channel to reach your goals.

Q: Why just demos instead of practicing with real hardware?
A: We are not ready to support a sufficient number of participants doing practical labs remotely with real hardware. This is more complicated and time consuming than in real life. Hence, what we we’re proposing is to replace practical labs with practical demonstrations shown by the instructor. The instructor will go through the normal practical labs with the standard hardware that we’re using.

Q: Would it be possible to run practical labs on the QEMU emulator?
R: Yes, it’s coming. In the embedded Linux course, we are already offering instructions to run most practical labs on QEMU between the sessions, before the practical demos performed by the trainer. We should also be able to propose such instructions for our Yocto Project and Buildroot training courses in the next months. Such work is likely to take more time for our Linux kernel course, practical labs being closer to the hardware that we use.

Q: Why proposing half days instead of full days?
A: From our experience, it’s very difficult to stay focused on a new technical topic for an entire day without having periodic moments when you are active (which happens in our public and on-site sessions, in which we interleave lectures and practical labs). Hence, we believe that daily slots of 4 hours (with a small break in the middle) is a good solution, also leaving extra time for following up your normal work.

Free seats in embedded Linux and kernel training sessions (Mar 2019)

Student penguinsAt Bootlin, we owe a lot to the Free Software community, and we’re doing our best to give back as much as we can.

One way of doing that is welcoming community contributors in our public training sessions organized in France. We’ve done that multiple times several years back, and this allowed us to meet very interesting people (who even had very valuable experience and points of view to share with the other course participants), while of course giving them extra knowledge that they can use for further contributions.

Here are the next sessions in which we can offer a free seat:

See our Free training seats page for practical details about how to apply.

Don’t hesitate to apply to this free seat. In past editions, we didn’t have so many people applying, and therefore you have a real chance to get selected!

Bootlin at the Embedded Linux Conference 2016

Like every year for about 10 years, the entire Bootlin engineering team will participate to the next Embedded Linux Conference, taking place on April 4-6 in San Diego, California. For us, participating to such conferences is very important, as it allows to remain up to date with the latest developments in the embedded Linux world, create contacts with other members of the embedded Linux community, and meet the community members we already know and work with on a daily basis via the mailing lists or IRC.

Embedded Linux Conference 2016

Over the years, our engineering team has grown, and with the arrival of two more engineers on March 14, our engineering team now gathers 9 persons, all of whom are going to participate to the Embedded Linux Conference.

As usual, in addition to attending, we also proposed a number of talks, and some of them have been accepted and are visible in the conference schedule:

As usual, our talks are centered around our areas of expertise: hardware support in the Linux kernel, especially for ARM platforms, and build system related topics (Buildroot, Yocto, autotools).

We are looking forward to attending this event, and see many other talks from various speakers: the proposed schedule contains a wide range of topics, many of which look really interesting!

Embedded Linux internships at Bootlin in 2016

Penguin worksBootlin has internship topics to propose to people studying in French Universities or Engineering Schools:

If you already have a project related to embedded Linux you would like to contribute to, we are also open to your own suggestions!

See all details on our blog post in French.

Bootlin talks at the Embedded Linux Conference Europe

Father Mathew BridgeThe Embedded Linux Conference Europe 2015 will take place on October 5-7 in Dublin, Ireland. As usual, the entire Bootlin engineering team will participate to the event, as we believe it is one of the great way for our engineers to remain up-to-date with the latest embedded Linux developments and connect with other embedded Linux and kernel developers.

The conference schedule has been announced recently, and a number of talks given by Bootlin engineers have been accepted:

We submitted other talks that got rejected, probably since both of them had already been given at the Embedded Linux Conference in California: Maxime Ripard’s talk on dmaengine and Boris Brezillon’s talk on supporting MLC NAND (which we regret since Boris is currently actively working on this topic, so we are expecting to have some useful results by the time of ELCE, compared to his ELC talk which was mostly a presentation of the issues and some proposals to address them). Interested readers can anyway watch those talks and/or read the slides.

In addition to the Embedded Linux Conference Europe itself:

  • Thomas Petazzoni will participate to the Buildroot developers meeting on October 3/4, right before the conference.
  • Alexandre Belloni will participate to the OEDEM, the 2015 OpenEmbedded Developer’s European Meeting, taking place on October 9 after the conference.

Embedded Linux Projects Using Yocto Project Cookbook

Embedded Linux Projects Using Yocto Project Cookbook Cover

We were kindly provided a copy of Embedded Linux Projects Using Yocto Project Cookbook, written by Alex González. It is available at Packt Publishing, either in an electronic format (DRM free) or printed.

It is written as a cookbook so it is a set of recipes that you can refer to and solve your immediate problems instead of reading it from cover to cover. While, as indicated by the title, the main topic is embedded development using Yocto Project, the book also includes generic embedded Linux tips, like debugging the kernel with ftrace or debugging a device tree from U-Boot.

The chapters cover the following topics:

  • The Build System: an introduction to Yocto Project.
  • The BSP Layer: how to build and customize the bootloader and the Linux kernel, plenty of tips on how to debug kernel related issues.
  • The Software layer: covers adding a package and its configuration, selecting the initialization manager and making a release while complying with the various licenses.
  • Application development: using the SDK, various IDEs (Eclipse, Qt creator), build systems (make, CMake, SCons).
  • Debugging, Tracing and Profiling: great examples and tips for the usage of gdb, strace, perf, systemtap, OProfile, LTTng and blktrace.

The structure of the book makes it is easy to find the answers you are looking for and also explains the underlying concepts of the solution. It is definitively of good value once you start using Yocto Project.

Bootlin is also offering a Yocto Project and OpenEmbedded training course (detailed agenda) to help you start with your projects. If you’re interested, join one of the upcoming public training sessions, or order a session at your location!

Embedded Linux and kernel job openings for 2015

At Bootlin, we are starting to get more and more requests for very cool projects. As it can be very frustrating to turn down very interesting opportunities (such as projects that allow us to contribute to the Linux kernel, Buildroot or Yocto Projects), we have decided to look for new engineers to join our technical team.

Job description in a nutshell

  • Technical aspects: mainline Linux kernel development, Linux BSP and embedded Linux system integration, technical training
  • Location: working in one of our offices in France (Toulouse or Orange)
  • Contract: full-time, permanent French contract

Mainline Linux kernel development

Believe it or not, we now have an increasing number of customers contracting us to support their hardware in the mainline Linux kernel. They are either System on Chip manufacturers or systems makers, who now understand the strong advantages brought by mainline Linux kernel support to their customers and to themselves.

You can see the results: Bootlin is now consistently in the top 20 companies contributing to the Linux kernel. We are even number 6 for Linux 4.0!

Note that this job doesn’t only require technical skills. It also has a strong social dimension, having to go through multiple iterations with the community and with kernel subsystem maintainers to get your code accepted upstream.

Linux BSP and embedded Linux system integration

Such activity involves developing and integrating everything that’s needed to deploy Linux on the customer hardware: bootloader, kernel, build environment (such as Buildroot or the Yocto project), upgrade system, optimizing performance (such as boot time) and fixing issues. Another way is to provide guidance and support to customer learning to do such a job.

As opposed to Linux kernel development projects which are often long term ones (though with step by step objectives which can be reached in days), these are usually shorter and more challenging projects. They allow us to stay in touch with the real-life challenges that customer engineers face every day, and that require to achieve substantial results in a relatively small number of days.

Such projects also constitute opportunities to contribute improvements to the mainline kernel and bootloader projects, as well to the build system projects themselves (Buildroot, Yocto Project, OpenWRT…).

Training and sharing experience

Knowledge sharing is an important part of Bootlin mission and activity. Hence, after gaining sufficient on-the-job experience, another important aspect of the job is teaching, maintaining and improving Bootlin training courses.

You will also be strongly incited to share your technical experience by writing blog posts or kernel documentation, and by proposing talks at international conferences, especially the Embedded Linux Conference (USA, Europe).

Profile

  • Experience: we are open to both experienced engineers and people just out of engineering schools. Though prior experience with the technical topics will be an advantage, we are also interested in young engineers demonstrating great potential for learning, coding and knowledge sharing. People having made visible contributions in these areas will have an advantage too.
  • Language skills: fluency in oral and written English is very important. French speaking skills won’t be a requirement, but an advantage too.
  • Traveling: for training sessions and conference participation, you will need the ability to travel rather frequently, up to 8-10 times a year.
  • Ability to relocate, to one of our offices in France, either in Toulouse or in Orange, to strengthen our engineering teams here.

Details about Toulouse and Orange

  • Toulouse is a dynamic city with lots of high-tech and embedded systems companies in particular. Our office in Colomiers can easily be reached by train from downtown Toulouse if you wish to settle there. You would be working with Boris Brezillon, Antoine Ténart, Maxime Ripard and our CTO Thomas Petazzoni.
  • Our main office is settled in Orange in the heart of the Provence region, close to Avignon, a smaller but dynamic city too. It enjoys a sunny climate and the proximity of the Alps and the Mediterranean sea. Accommodation is very affordable and there are no traffic issues! You would be working with our founder Michael Opdenacker and of course remotely with the rest of the engineering team. In particular, we are interested in foreign engineers who could help us develop our services in their home countries.

We prefer not to offer home based positions for the moment, which have their own complexity and cost, while we have plenty of space left in our current offices.

See a full description and details about how to contact us.

Embedded Linux Conference schedule announced, several talks from Bootlin

The schedule for the upcoming Embedded Linux Conference, which takes place on March 23-25 in San Jose, has been announced and is available publicly at http://elcabs2015.sched.org/, together with the Android Builders Summit schedule. As usual, there are lots of talks that look very interesting, so we can expect a very useful conference once again.

ELC 2015

This time around, there will be three talks given by Bootlin engineers:

So, book your tickets, and join us for the Embedded Linux Conference at the end of March!